Transform your website into an interactive support hub by adding the MyPersonas floating action button. This feature allows your visitors to instantly access your digital experts directly from any page on your website, providing 24/7 assistance without leaving their browsing experience.
Overview
The MyPersonas floating action button is a customizable widget that appears on your website, giving visitors immediate access to your configured MyPersonas. When clicked, it opens an interactive chat interface where users can engage with your AI-powered experts.
Key Benefits:
- Seamless Integration: Works with any website or web application
- Dual Purpose: Provides both chat capabilities and knowledge from your website content
- Customizable Appearance: Tailor the button text, position, and branding to match your site
- No Code Complexity: Simple script installation similar to Google Analytics
Prerequisites
Before you begin, ensure you have:
- Website Access: Administrative access to add scripts to your website's header
- A MyPersona: At least one configured MyPersona to appear on your website
- Website URL: The complete URL where you want to deploy the button
Step 1: Create the Website Integration
Navigate to Integrations
From your MyPersonas dashboard, click Integrations in the left sidebar.
Create New Integration
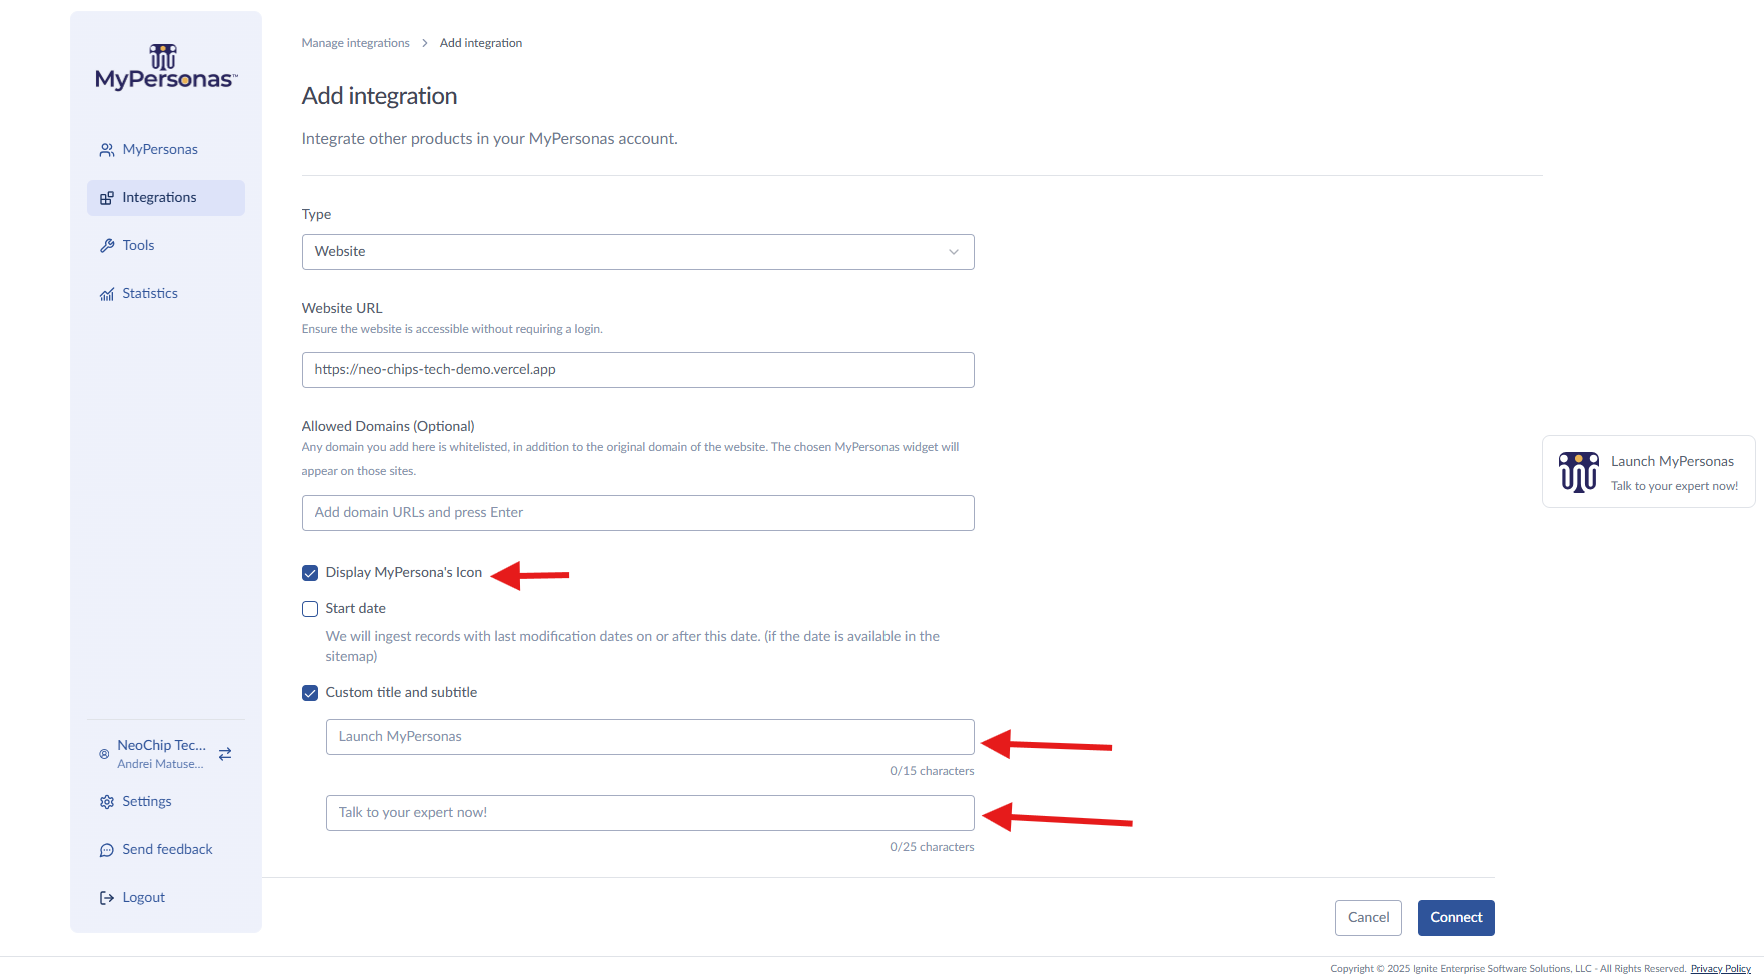
- Click New Integration in the top-right corner
- Select Website from the dropdown menu
- Enter your website URL (e.g.,
https://yourwebsite.com)
Configure Integration Settings
Essential Settings:
- ✅ Display MyPersonas icon: Must be checked to show the floating button
- Allowed domains: Add subdomains if you want the button on multiple versions of your site (e.g.,
eu.yoursite.com,shop.yoursite.com)
Optional Customization:
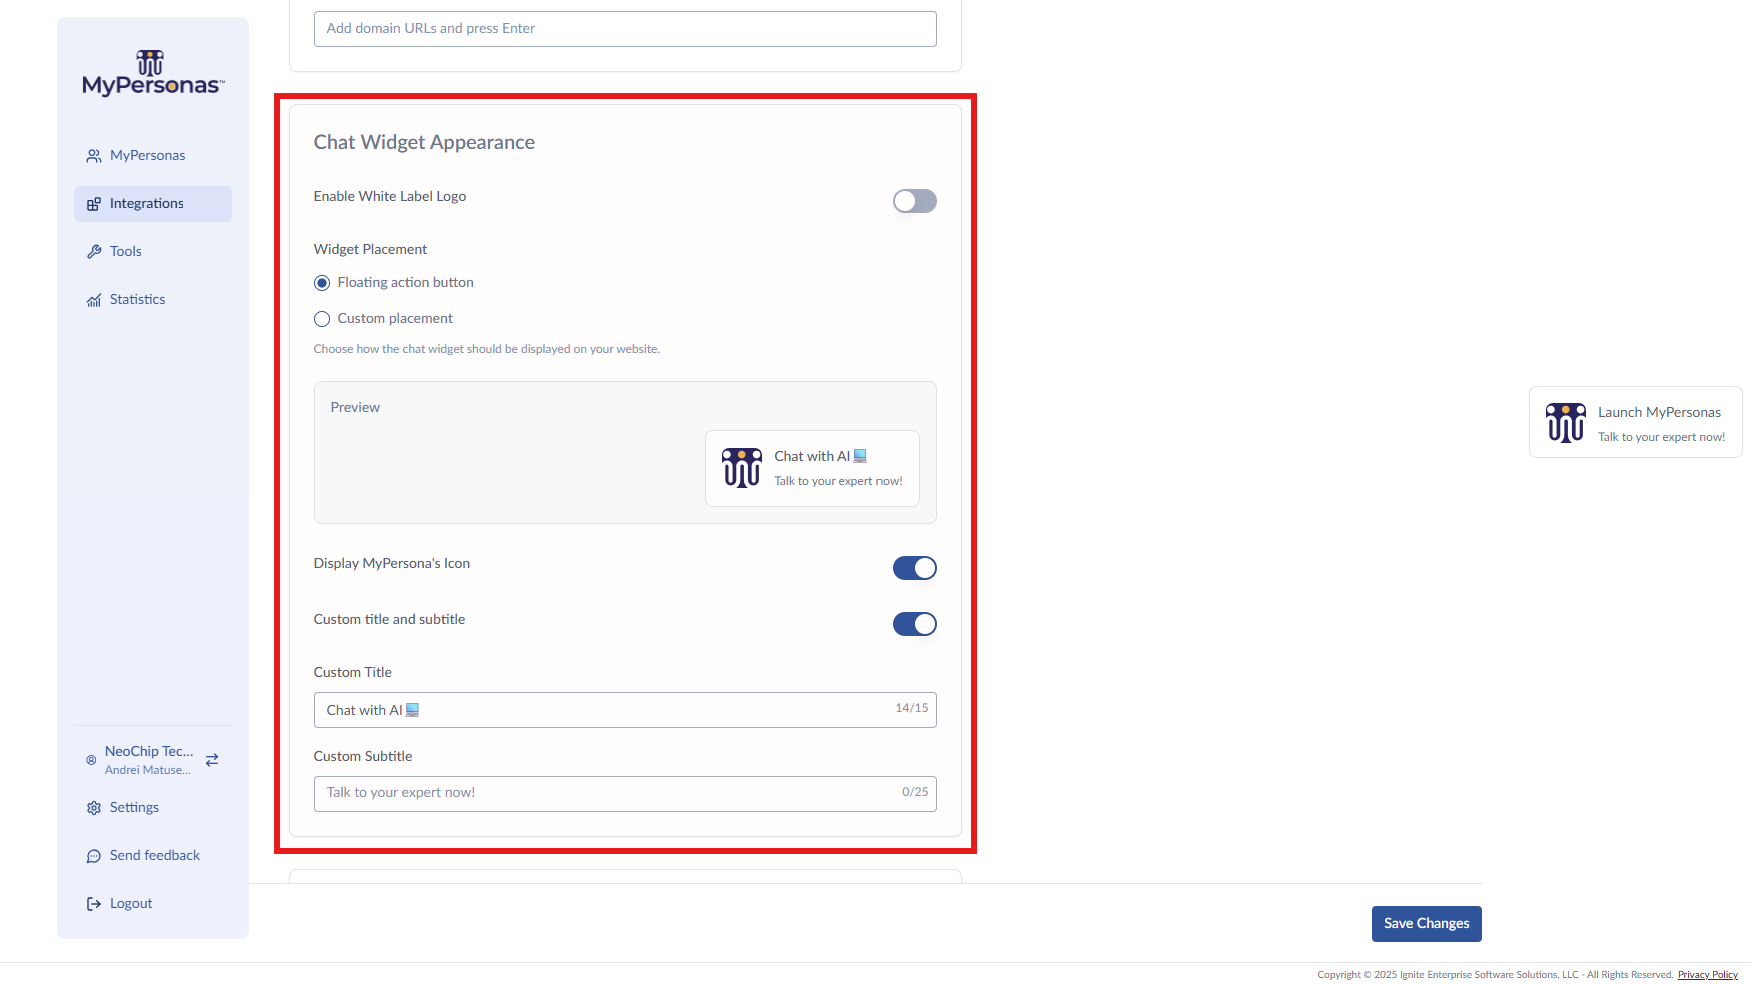
- Custom title: Change the button's main text (default: "Launch MyPersonas")
- Custom subtitle: Modify the description text (default: "Talk to your expert")
Select Pages and Create
- Click Connect to map your website
- Select which pages to ingest as knowledge (or select all)
- Add any additional URLs if needed
- Click Create
Step 2: Add the Script to Your Website
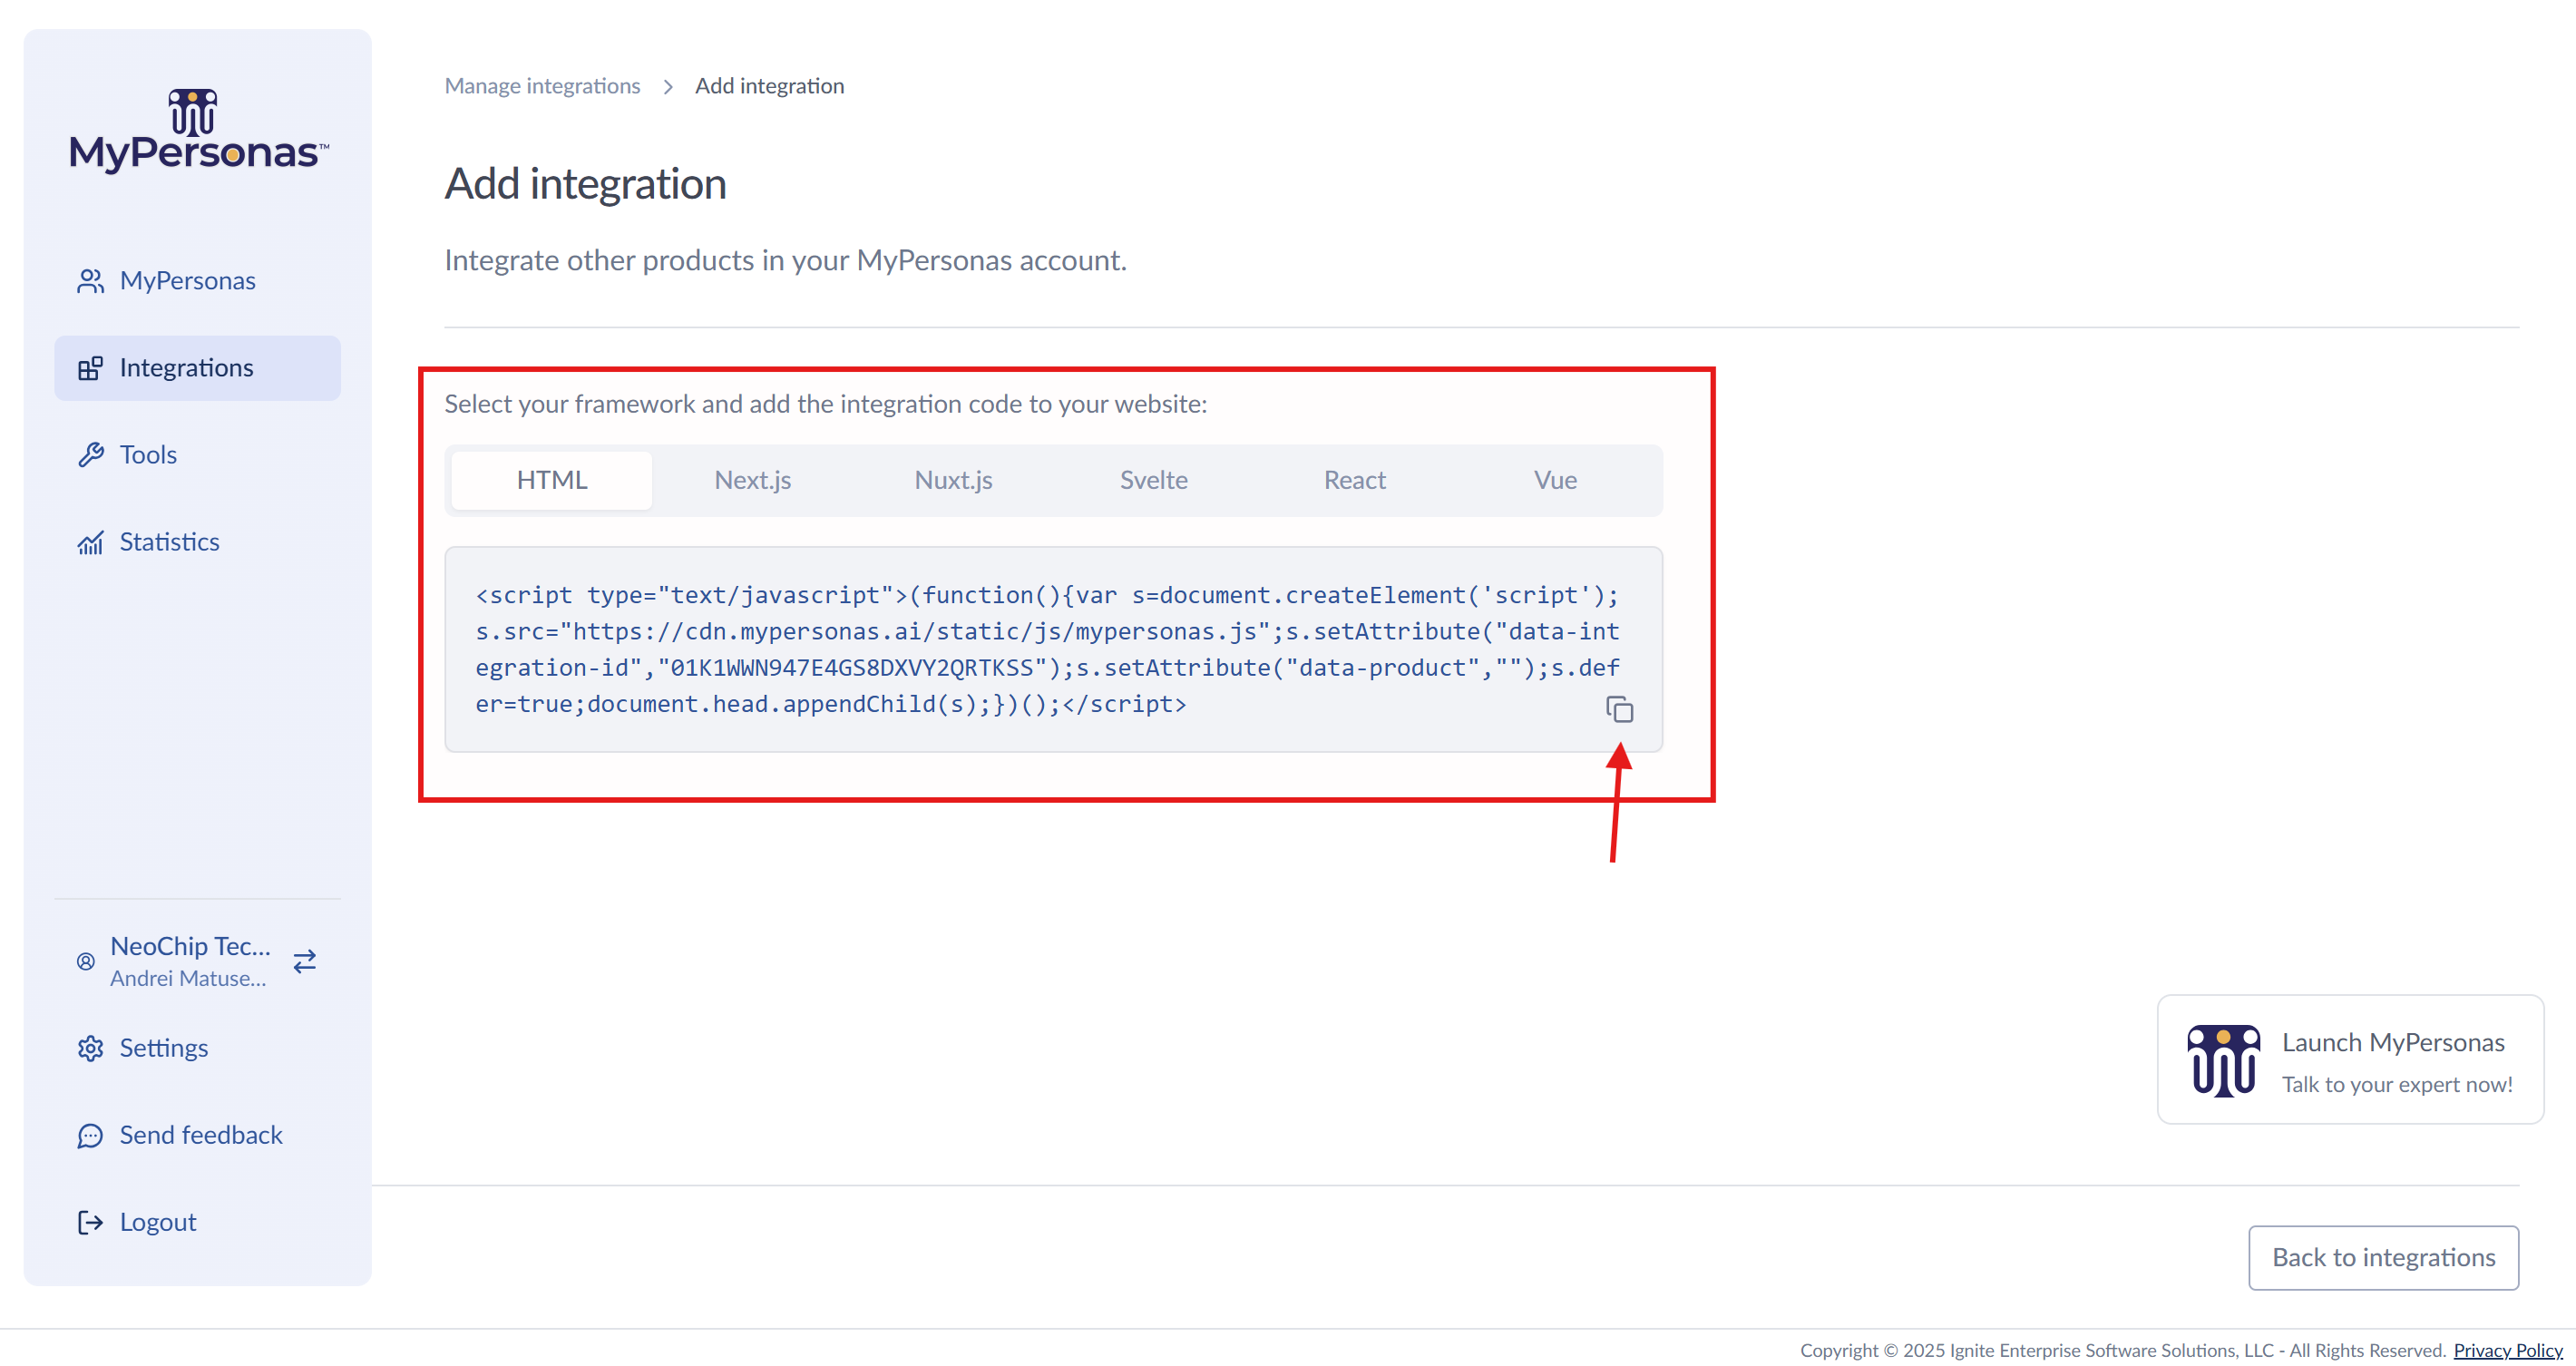
After creating the integration, you'll see the scripts page with installation code.
Copy the Installation Script
Choose the appropriate script format for your website:
- Standard HTML websites
- React applications
- Next.js projects
- Other frameworks
Install the Script
Add the copied script to your website's header section, similar to how you would add Google Analytics or other tracking scripts.
<!-- Add this to your website's <head> section -->
<script src="..." async></script>
Step 3: Connect Your MyPersona
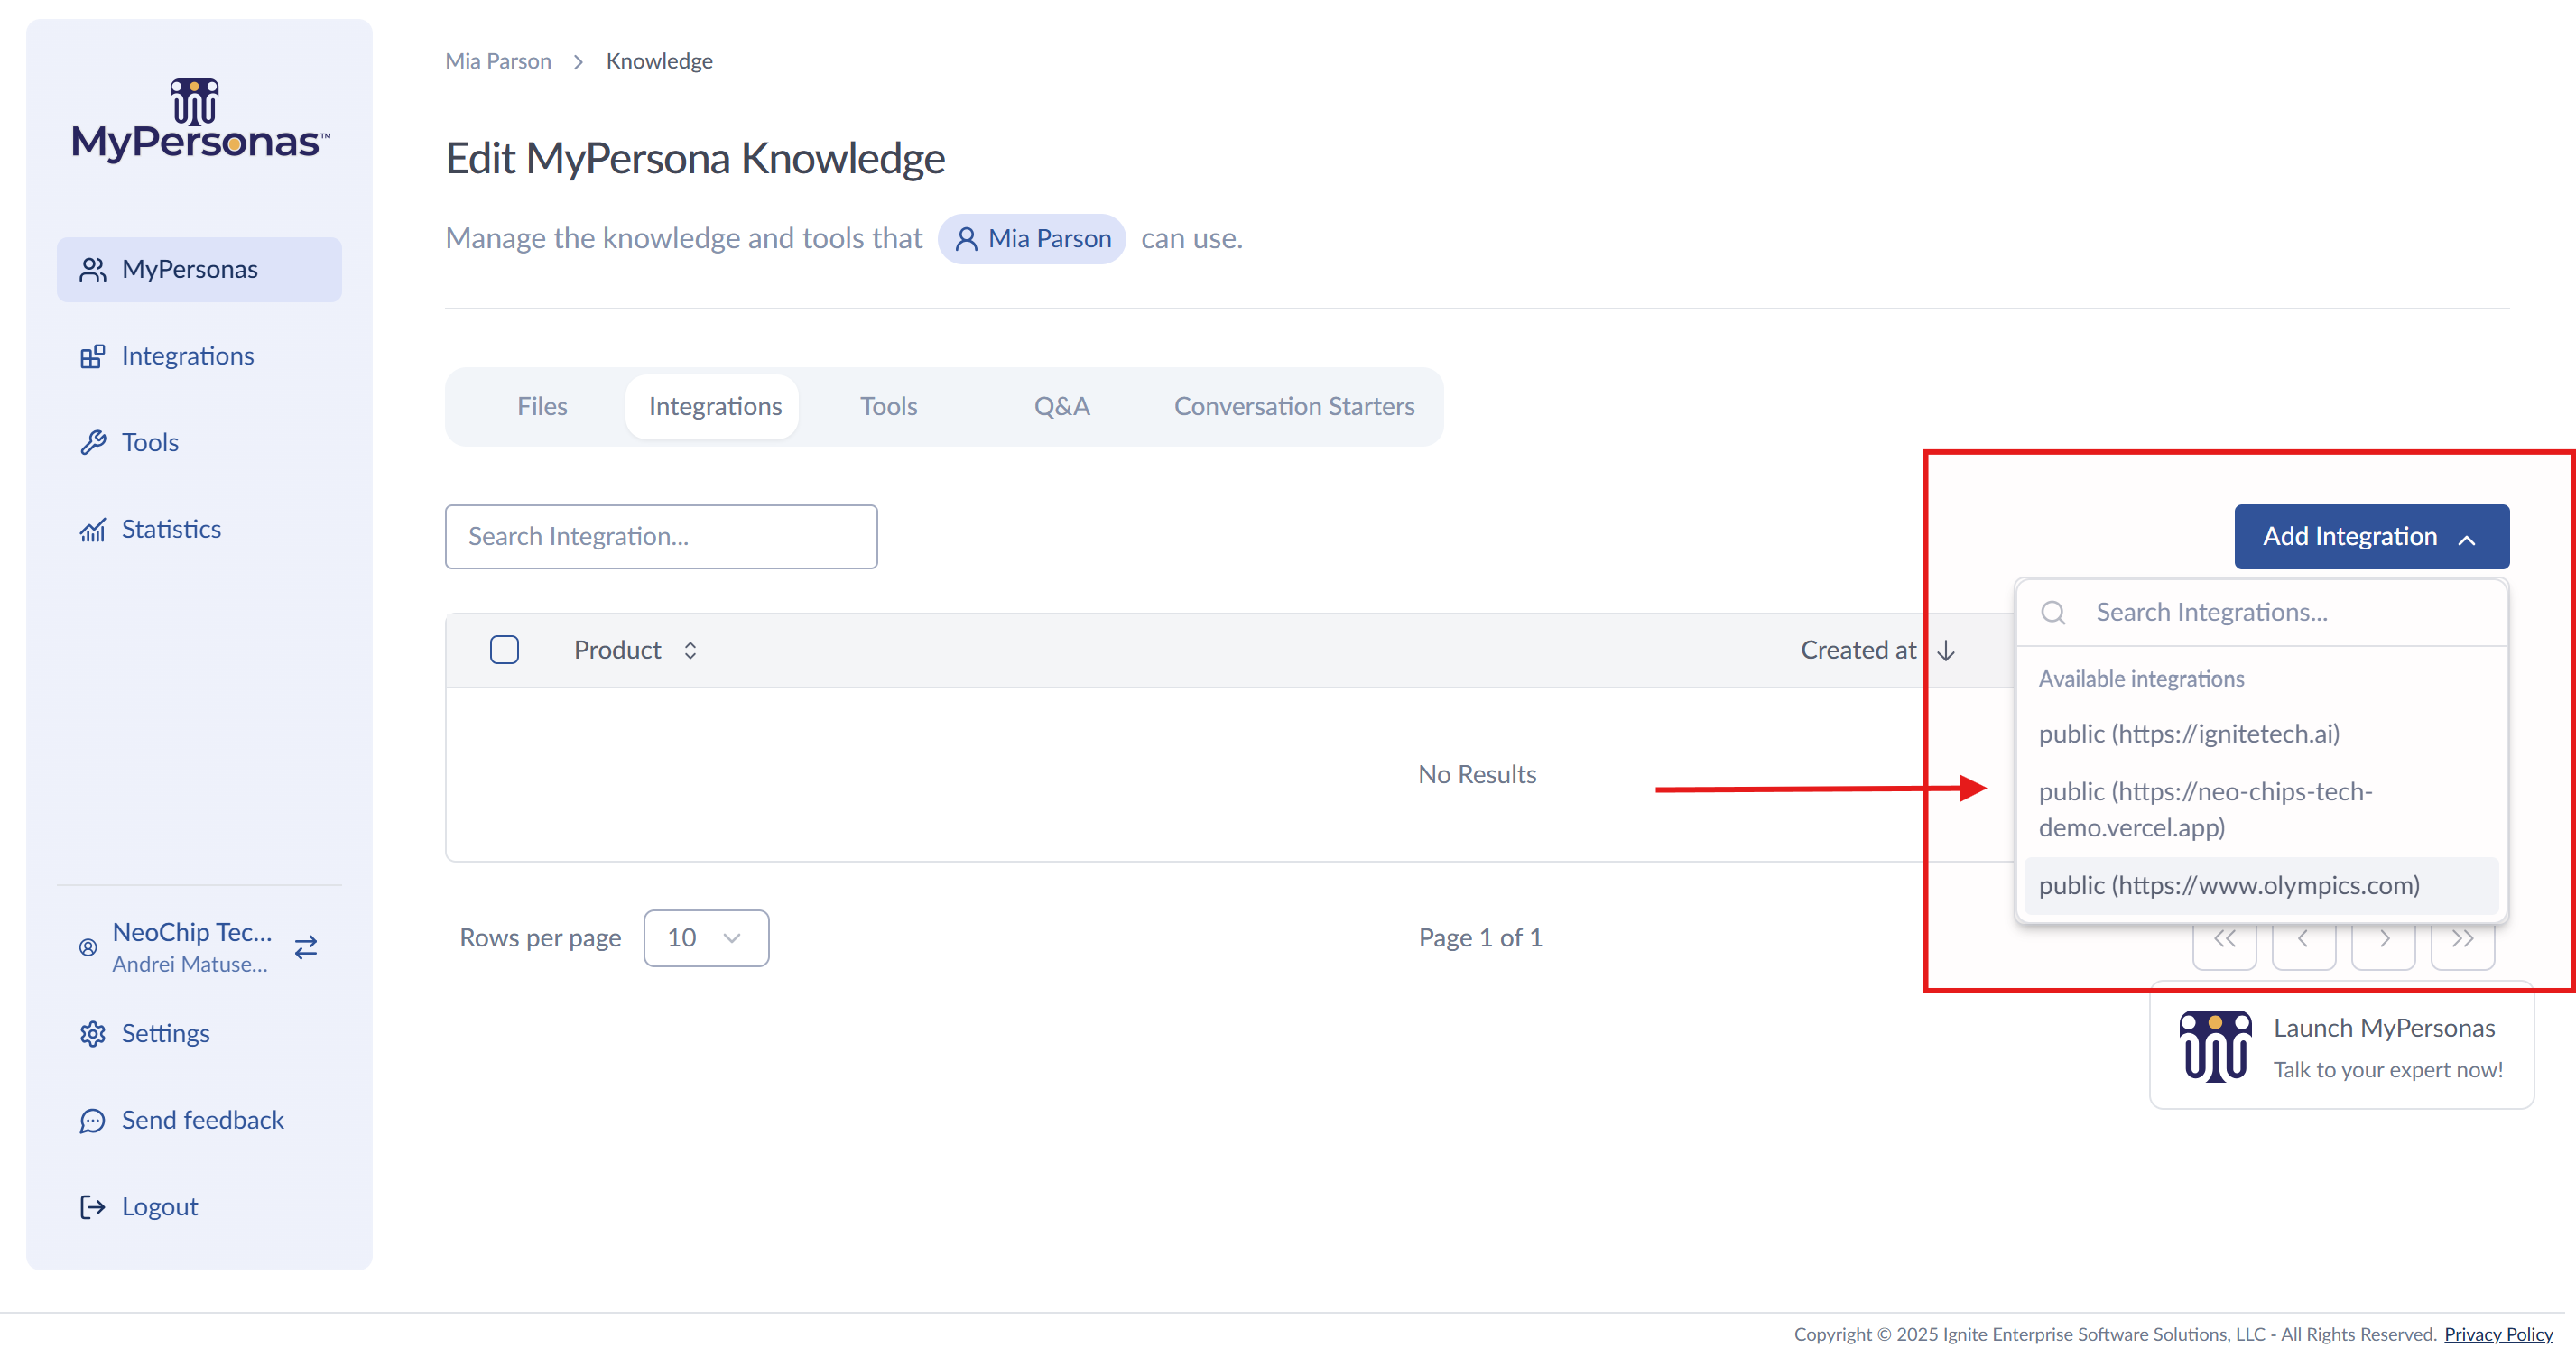
Important: The floating button won't display any MyPersonas until you explicitly connect them.
Add Integration to Your MyPersona
- Go to the MyPersonas tab
- Click the menu (⋮) on your MyPersona card
- Select Manage Knowledge
- Navigate to the Integrations tab
- Click Add Integration
- Select your website integration
Step 4: Verify Installation
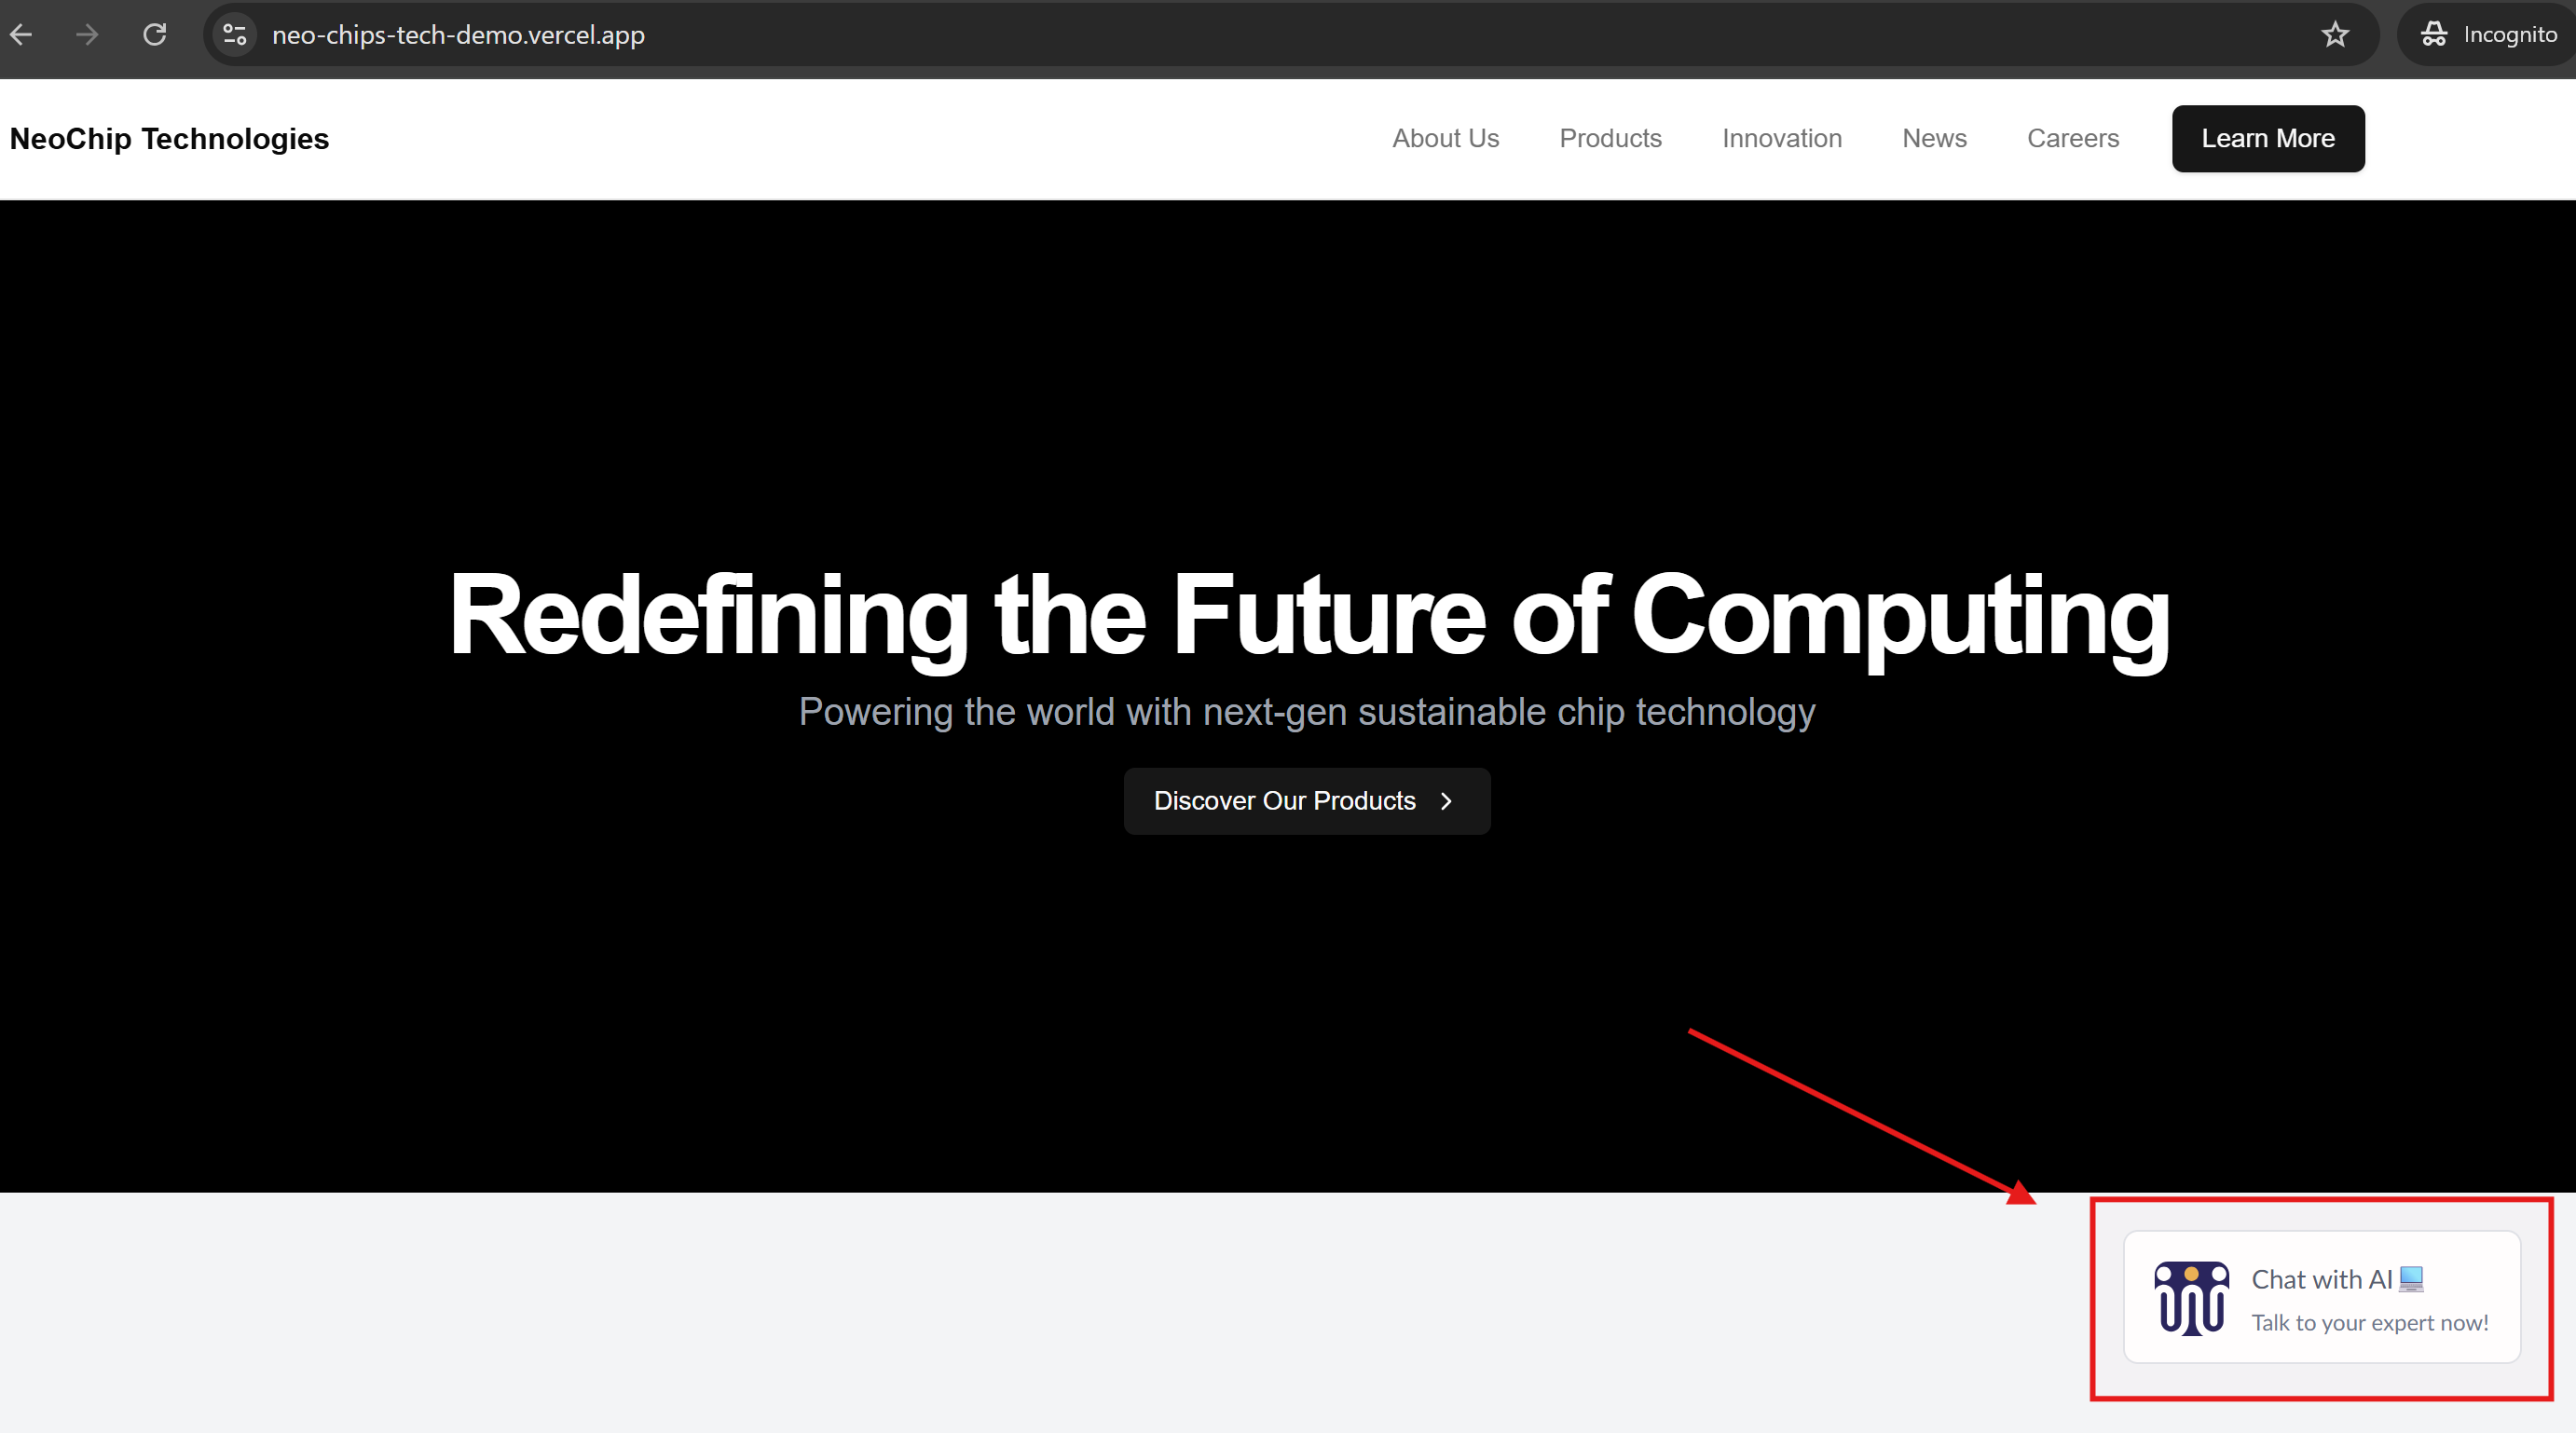
- Visit your website and refresh the page
- Look for the floating action button (default: bottom-right corner)
- Click the button to open the chat interface
- Verify your MyPersona appears and can answer questions
Customization Options
Button Appearance
Access customization options by editing your integration:
- Go to Integrations
- Click the menu (⋮) on your integration
- Select Edit
- Navigate to Chat Widget Appearance
Customizable Elements:
- Position: Default is bottom-right, but can be anchored elsewhere
- Title & Subtitle: Modify the button text
- Logo: Upload custom branding (if available in your plan)
Advanced Positioning
The button is draggable by default, users can hover and drag it to reposition. For fixed custom positioning, use the placement options in settings.
Managing Multiple Domains
To show the floating button across multiple subdomains:
- Add each subdomain to the Allowed domains field during setup
- Format:
subdomain.yoursite.com - The script only needs to be added once to your main domain
Knowledge Base Integration
Your website content becomes part of your MyPersona's knowledge:
- The MyPersona can answer questions about your products/services
- Automatically stays updated if auto-refresh is enabled
- You can limit which pages the MyPersona can reference
To customize knowledge access:
- Edit the integration from your MyPersona's knowledge management
- Select/deselect specific pages
- Save changes
Troubleshooting
Button Not Appearing
- Verify the script is properly installed in your website's header
- Check that "Display MyPersonas icon" is enabled in integration settings
- Clear your browser cache and refresh
No MyPersonas Showing
- Ensure you've added the website integration to at least one MyPersona
- Verify the integration status shows "Completed"
- Check that the MyPersona is active
Custom Styling Issues
- The button inherits some styles from your website
- Use CSS overrides if needed for specific positioning
- Contact support for advanced customization needs
Best Practices
- Strategic Placement: Keep the button visible but not intrusive
- Clear Labeling: Use descriptive title/subtitle text that indicates the button's purpose
- Knowledge Sync: Enable auto-refresh to keep website content current
- Multiple MyPersonas: You can add multiple MyPersonas to appear based on different pages or user needs
Next Steps
- Learn about Managing MyPersona Knowledge to optimize responses
- Explore Analytics to track engagement with your floating button
- Discover Advanced Integrations for connecting additional systems
Mo. Mitwaly
Comments