MyPersonas supports multi-user collaboration by allowing owners or guests to join an ongoing conversation with a digital MyPersona. Whether you're adding a team member or inviting an external expert, you can bring others into the conversation securely and seamlessly.
This guide walks you through the two primary methods for inviting participants:
-
Sharing a conversation URL with authenticated users
-
Sending a guest invitation via email
Method 1: Invite via Conversation URL (Authenticated Users)
Step 1: Start a Conversation with MyPersona
-
Click on the “Launch MyPersonas” floating action button to begin a session.
-
Ensure you're in Video Mode or Video + Text Mode, which activates the necessary interface elements.
Step 2: Copy the Conversation URL
-
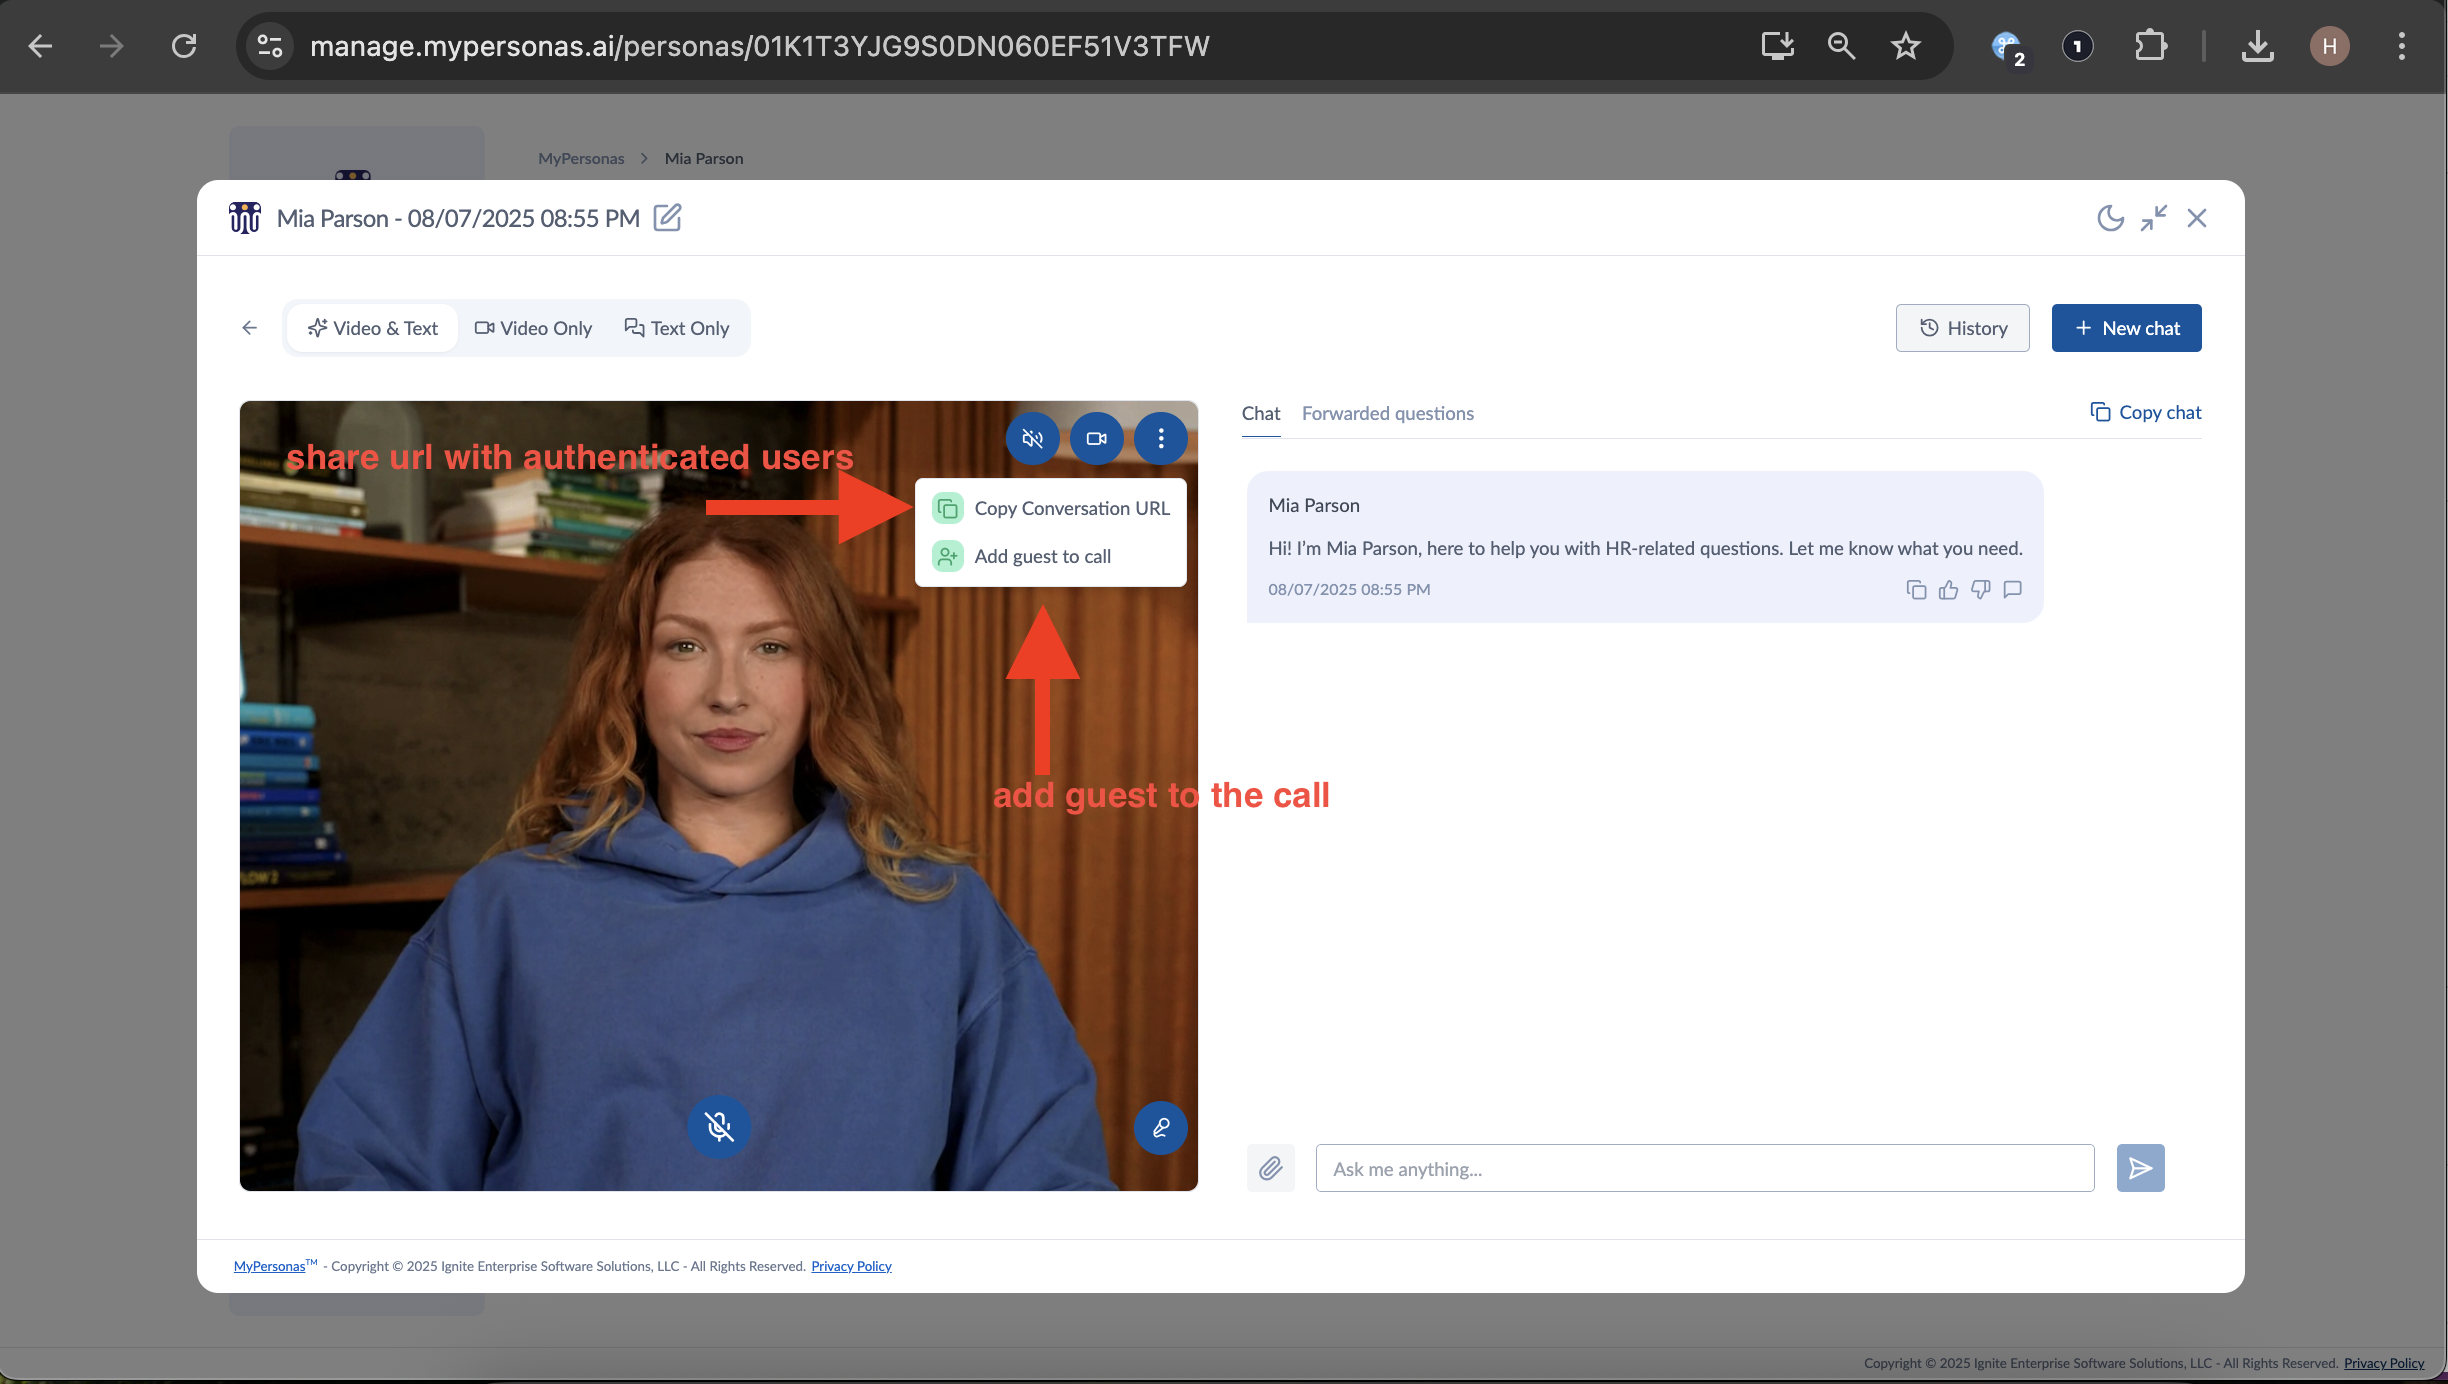
Click the menu button (⋮) at the top right of the video interface.
-
Select “Copy Conversation URL”.
-
Share this URL with another authenticated user of the MyPersonas admin dashboard.
🔒 Note: Only users logged into the MyPersonas admin dashboard will be able to access the session using this link.
Step 3: Allow the Join Request
When the invited user accesses the link:
-
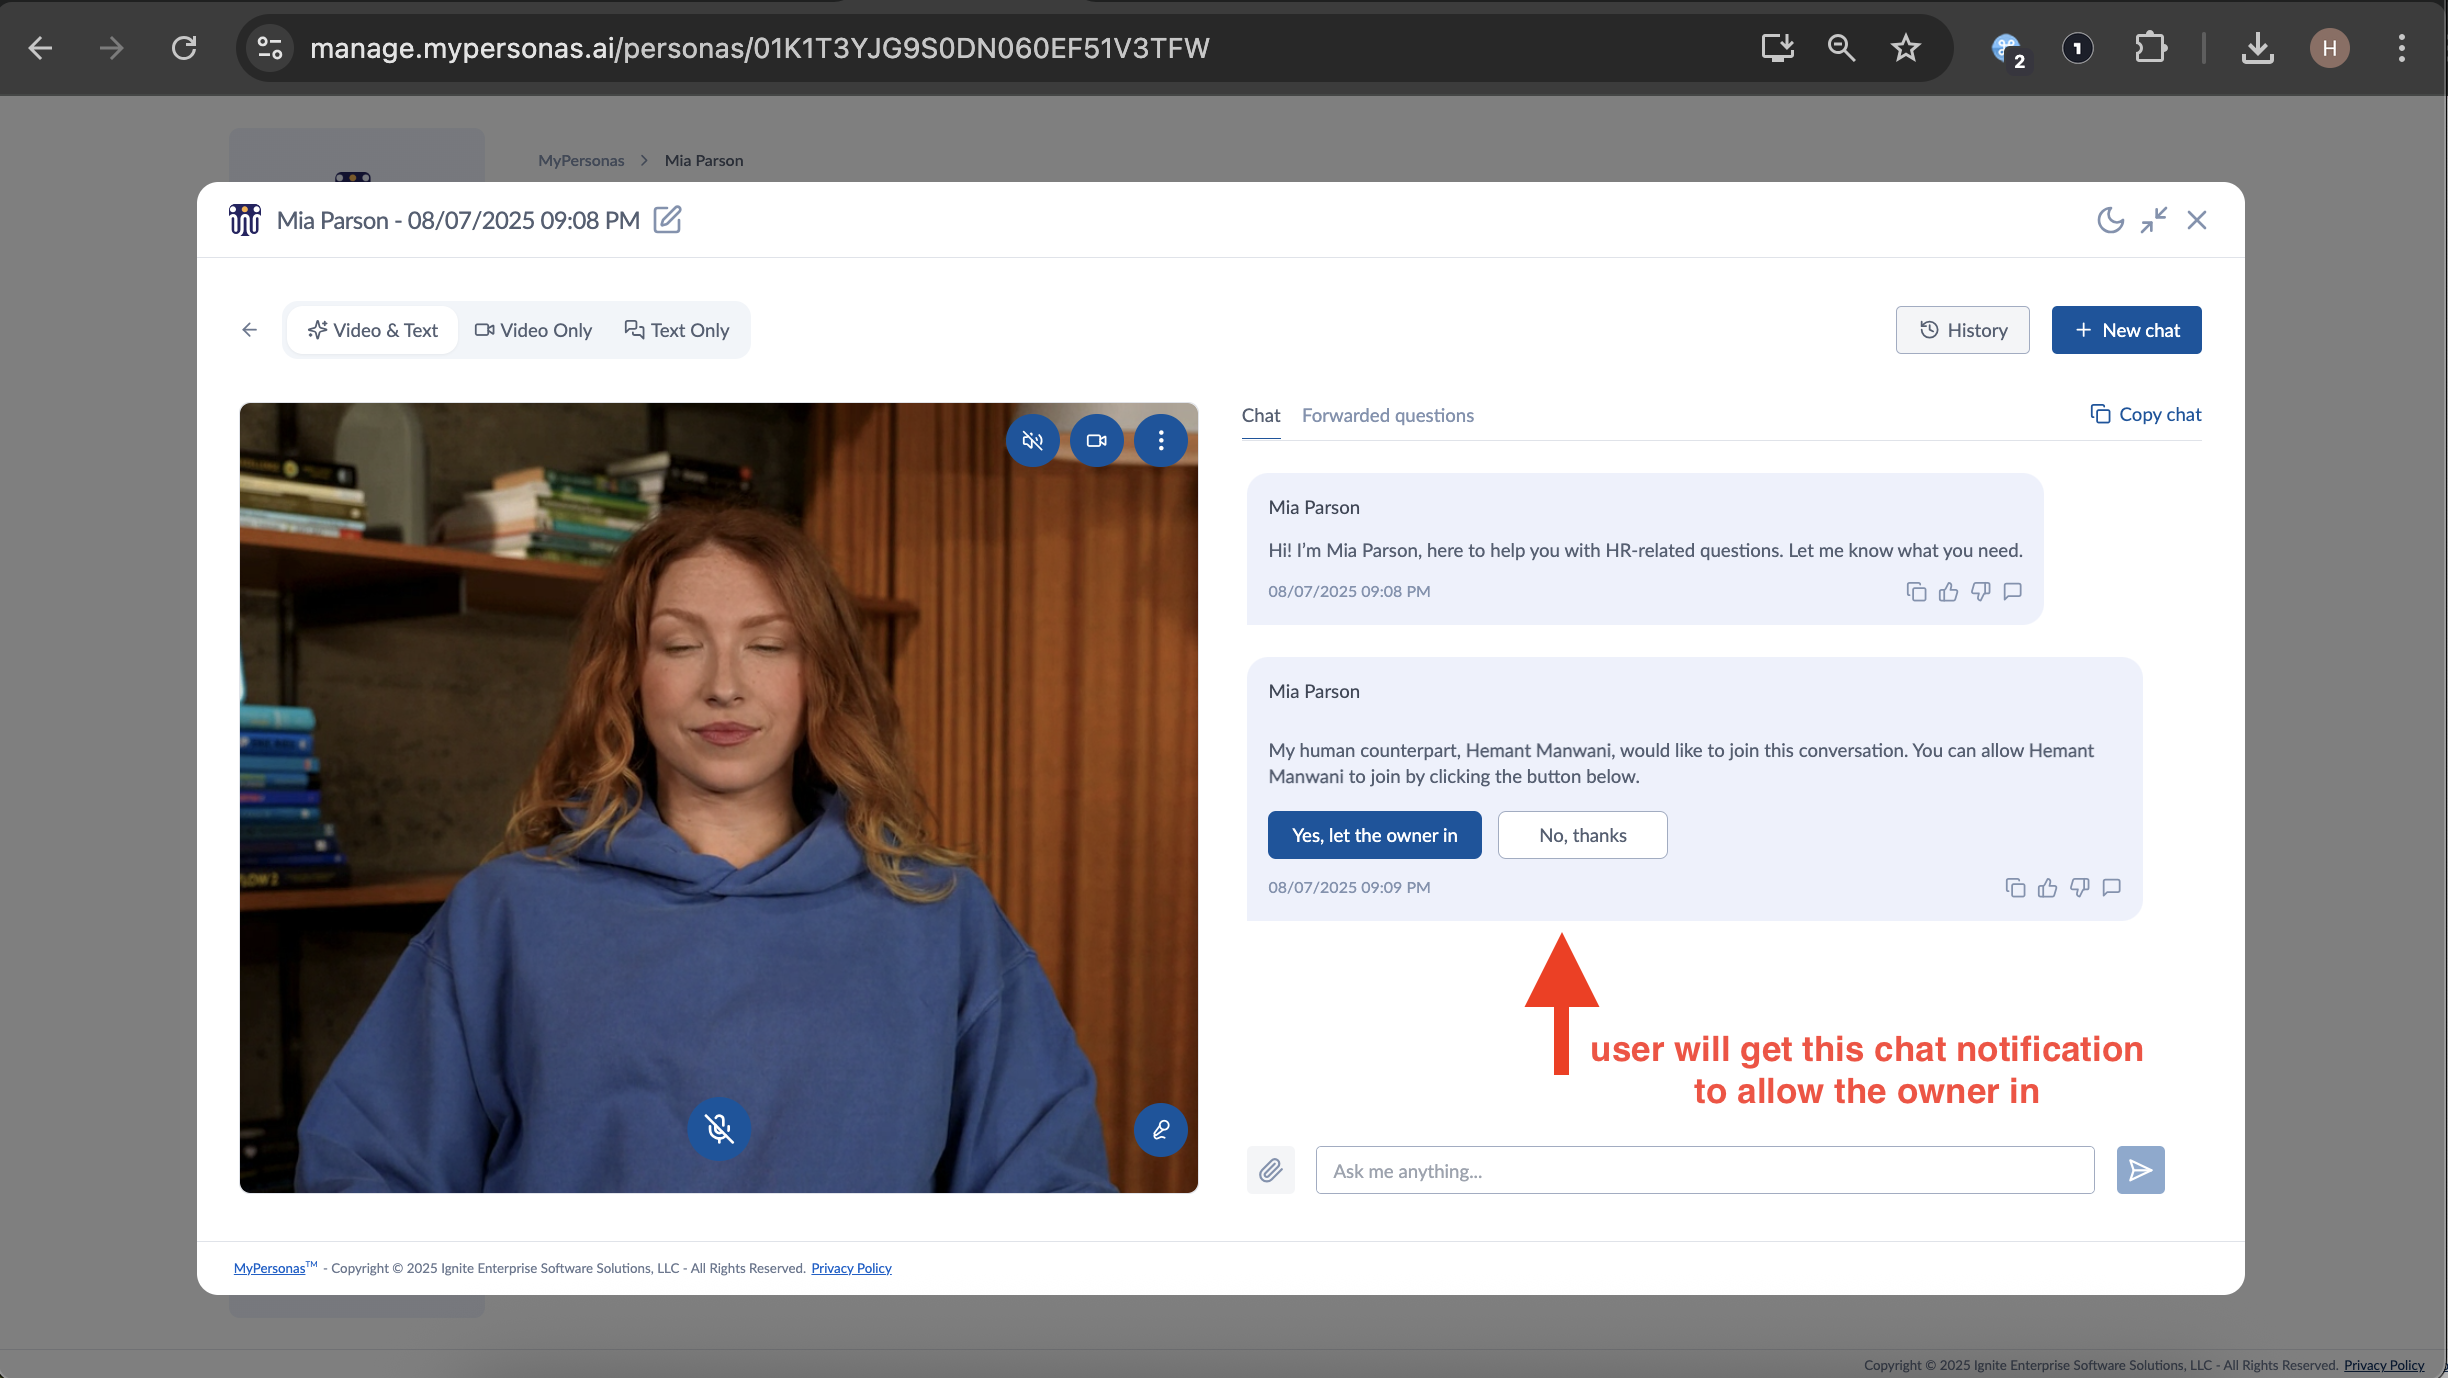
You will receive a chat notification:
“[Name] would like to join this conversation. You can allow them to join by clicking the button below.”
-
You have two options:
-
Let the user in
-
No thanks (reject the request)
-
Rejected users will see a message that their request was declined and can try again later.
Step 4: Accept and Start the Call
Once accepted:
-
The user can configure audio/video settings and click Join.
-
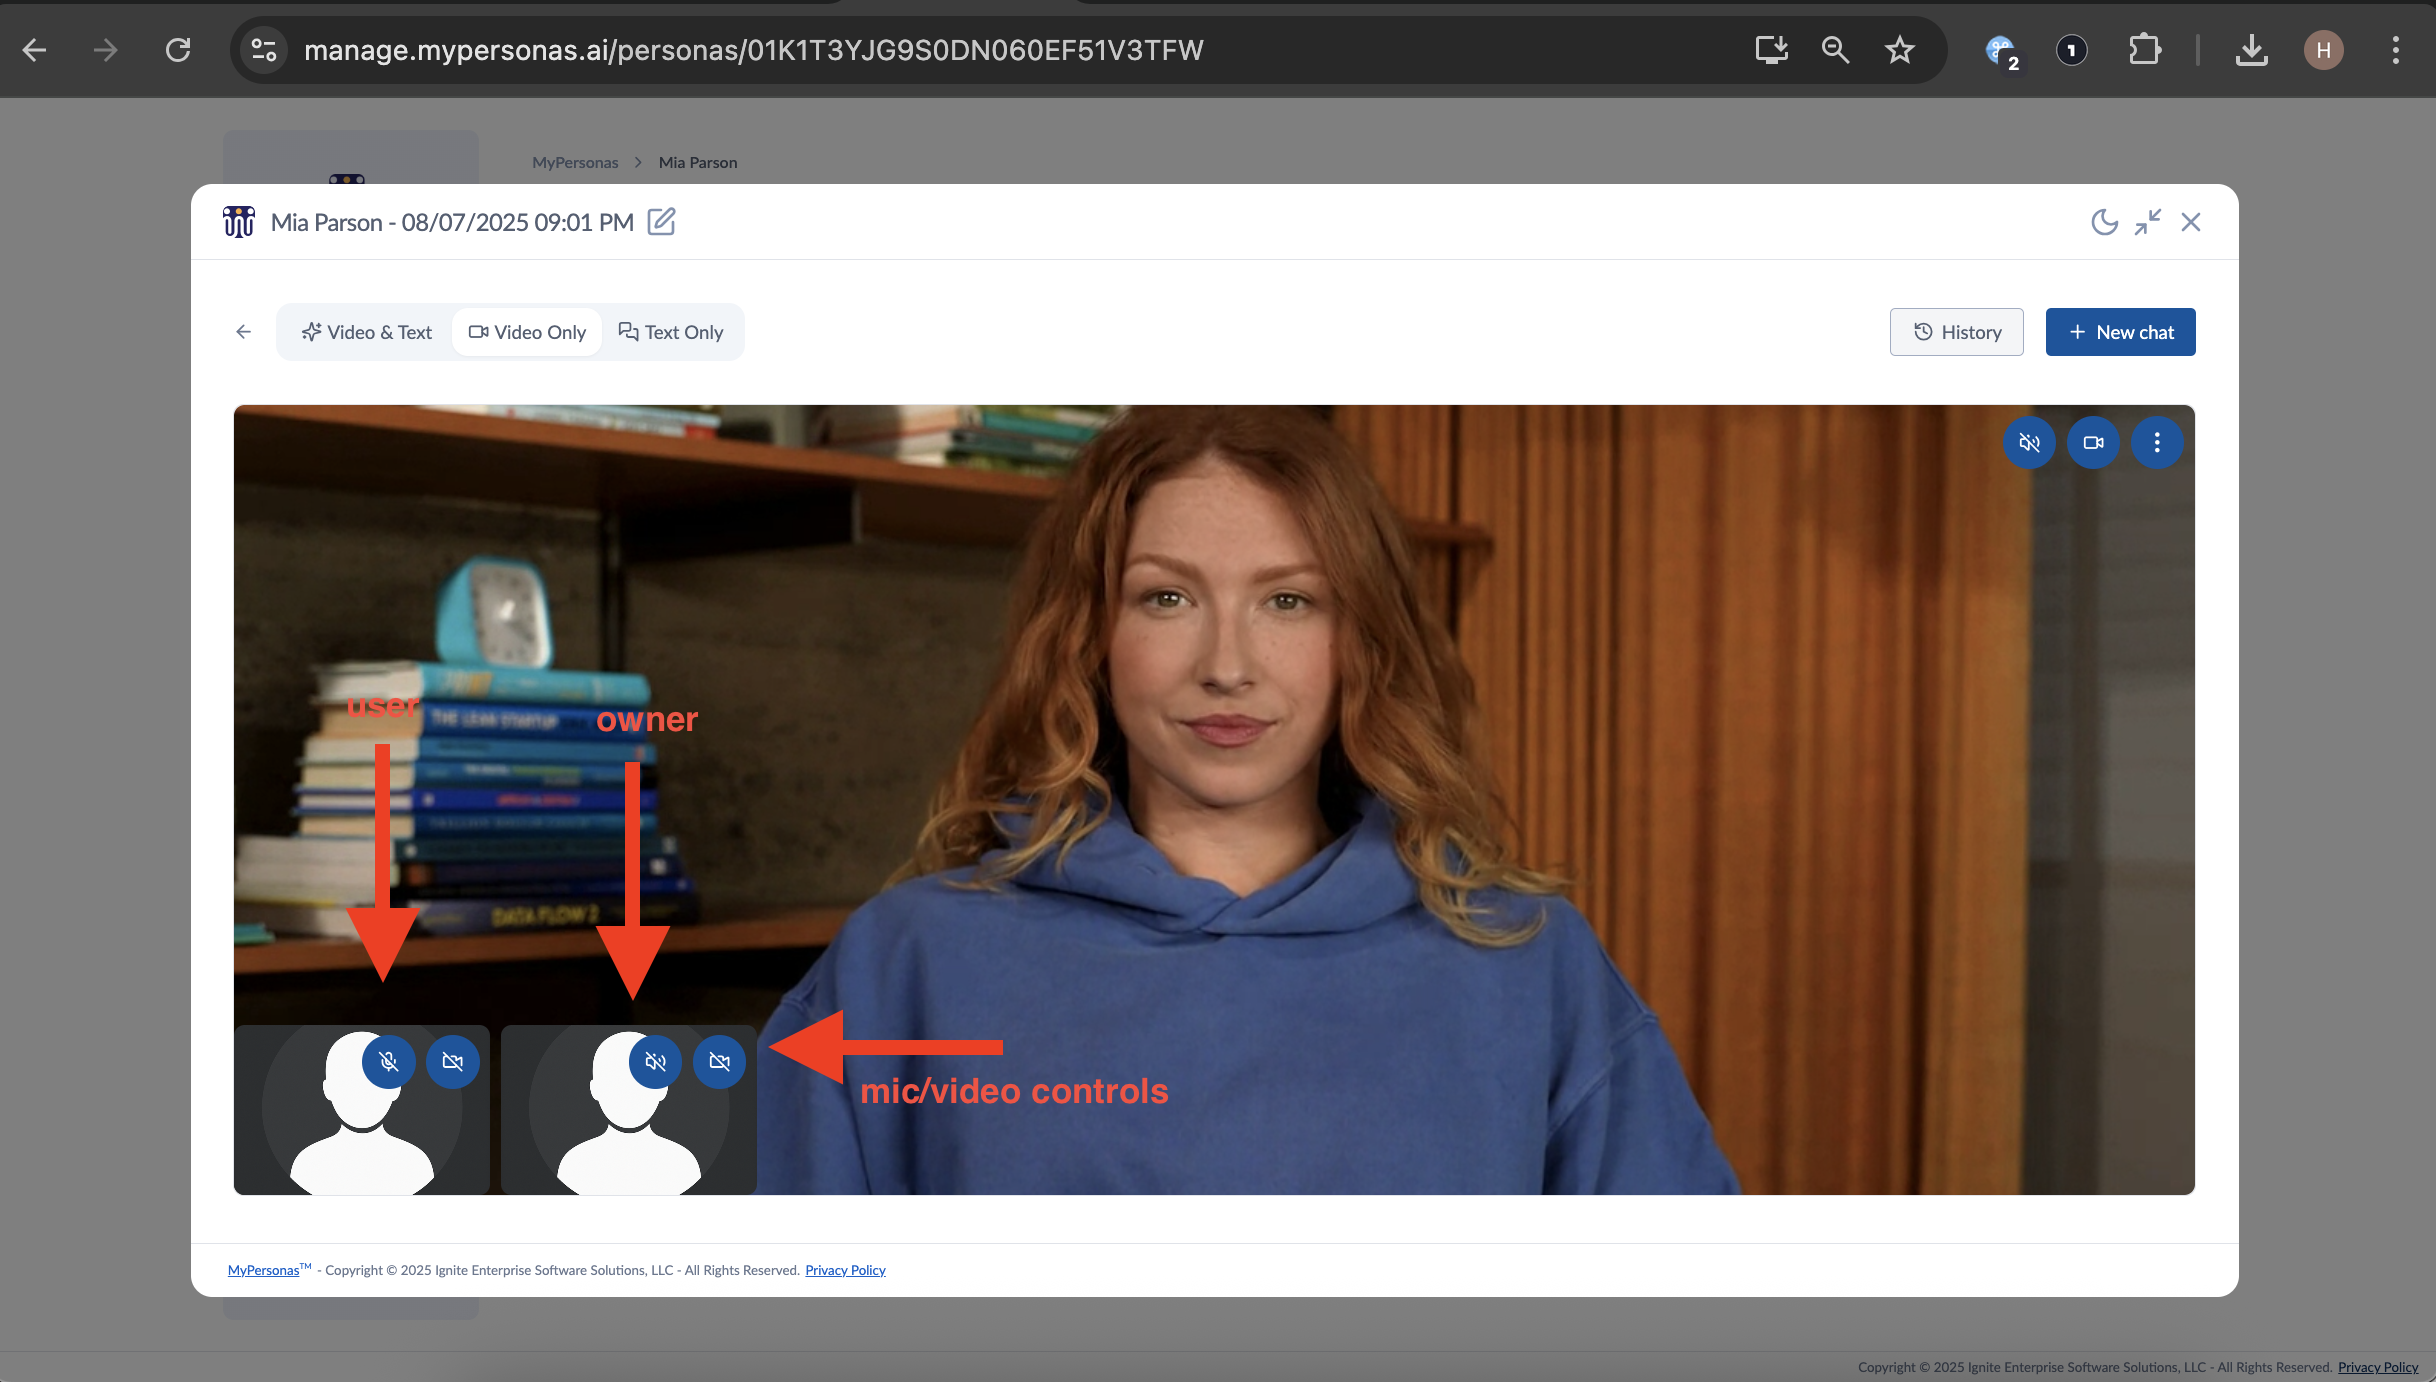
The interface switches to video mode, showing all participants at the bottom-left of the screen.
-
All parties (user, owner, MyPersona) can now interact in a shared video session.
Method 2: Invite a Guest via Email
Step 1: Access Guest Invitation Option
-
While in an active session, click the menu button (⋮) on the top right.
-
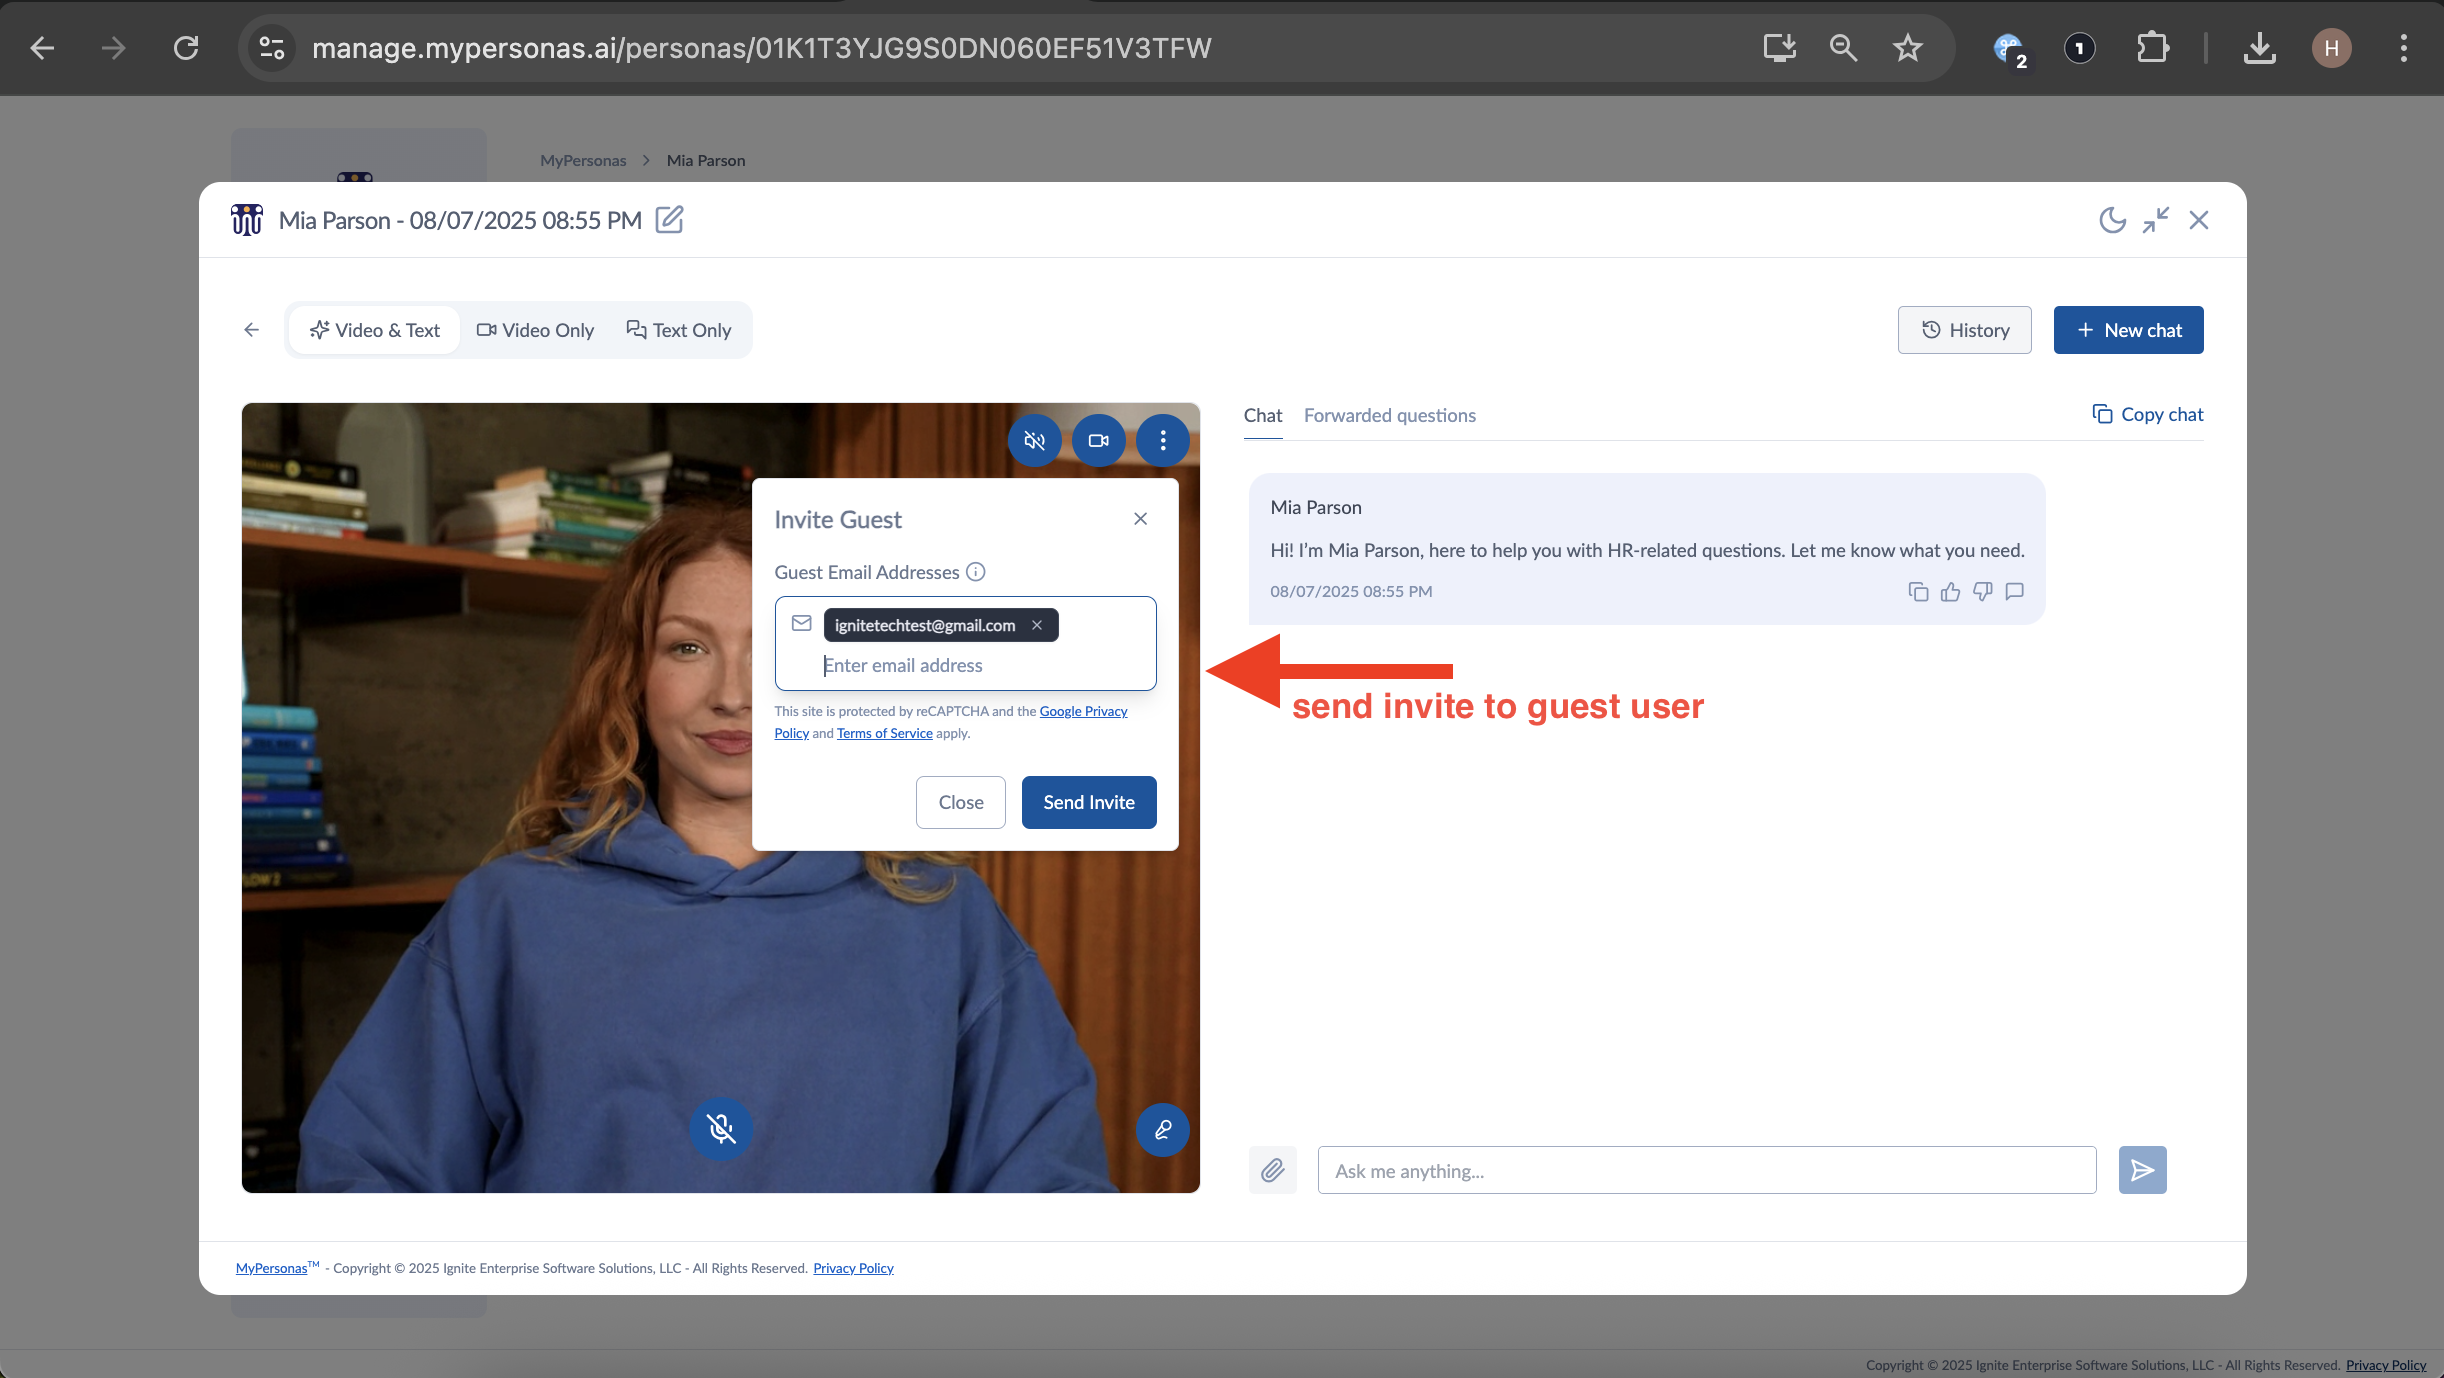
Select the option to Add Guest by Email.
Step 2: Enter Guest Email and Send Invitation
-
Input the guest’s email address.
-
Click Send Invite.
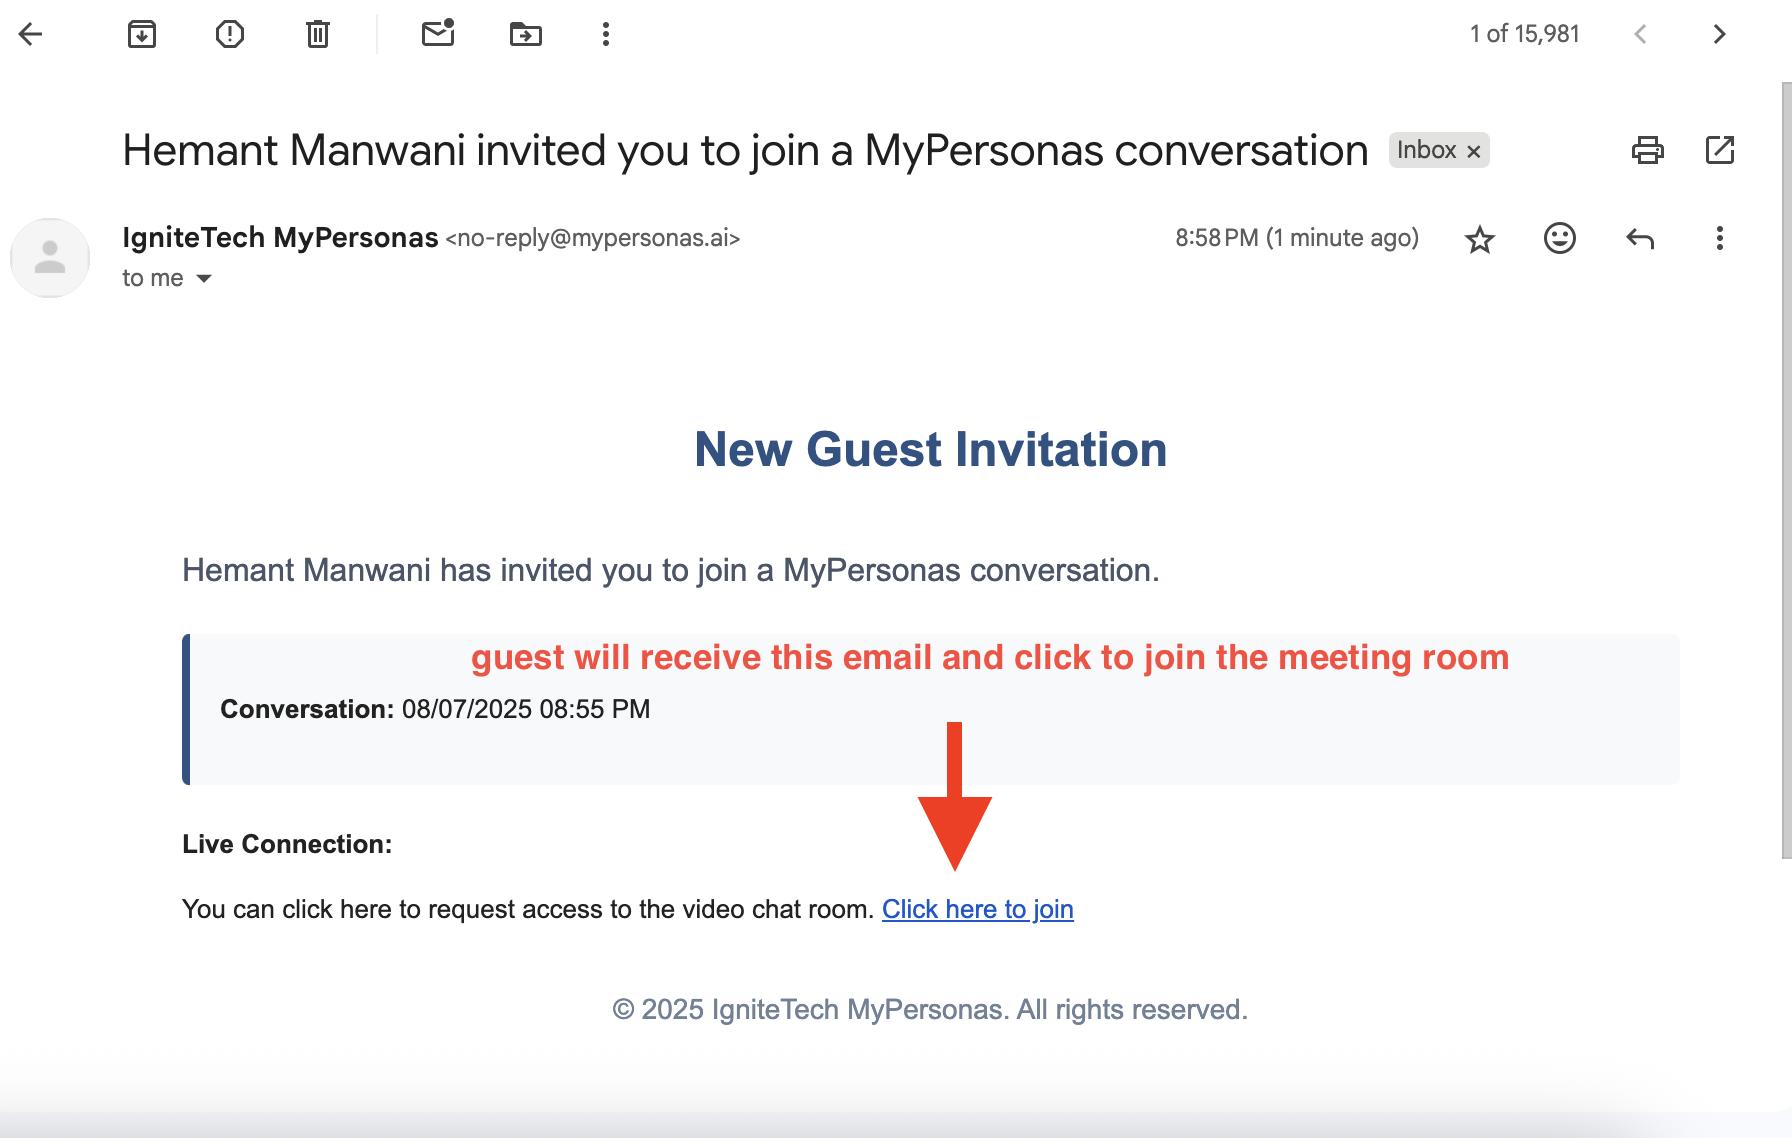
📧 The guest does not need to be a MyPersonas admin or authenticated user.
Step 3: Guest Joins the Meeting
When the guest opens the invitation link:
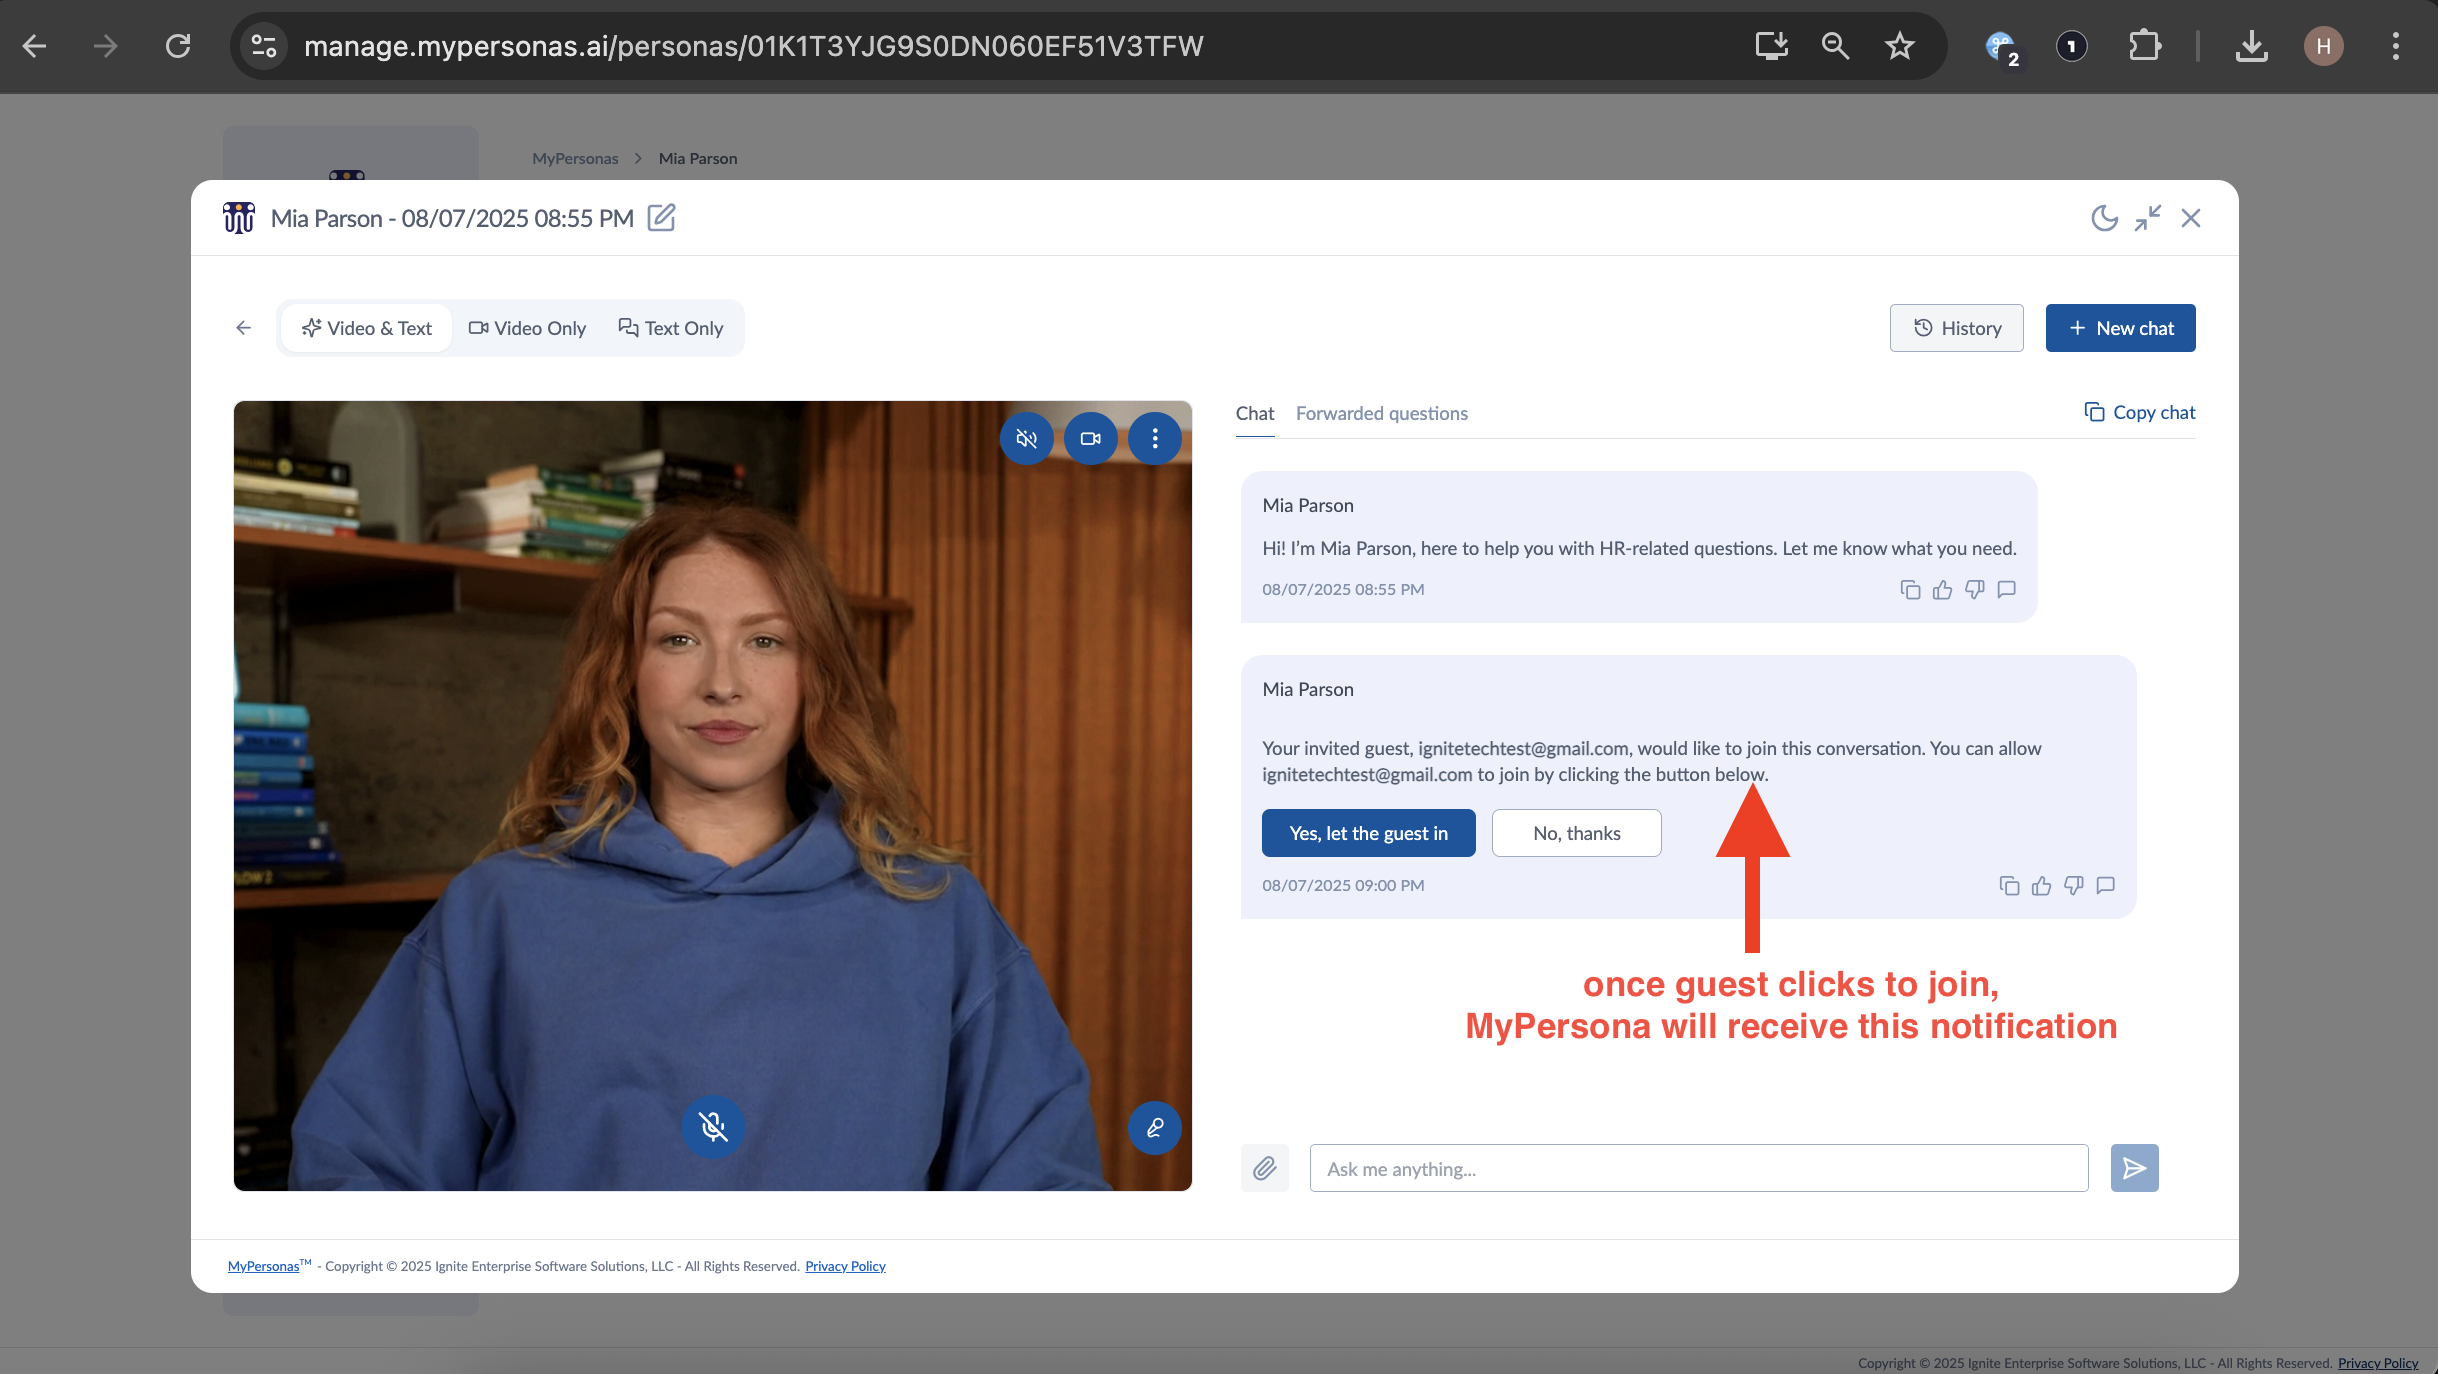
-
You'll receive a notification in the chat:
“Your invited guest ([email]) would like to join this conversation. You can allow them to join by clicking the button below.”
-
You may either:
-
Let the guest in
-
No thanks
-
Rejected guests will be notified that the request was declined.
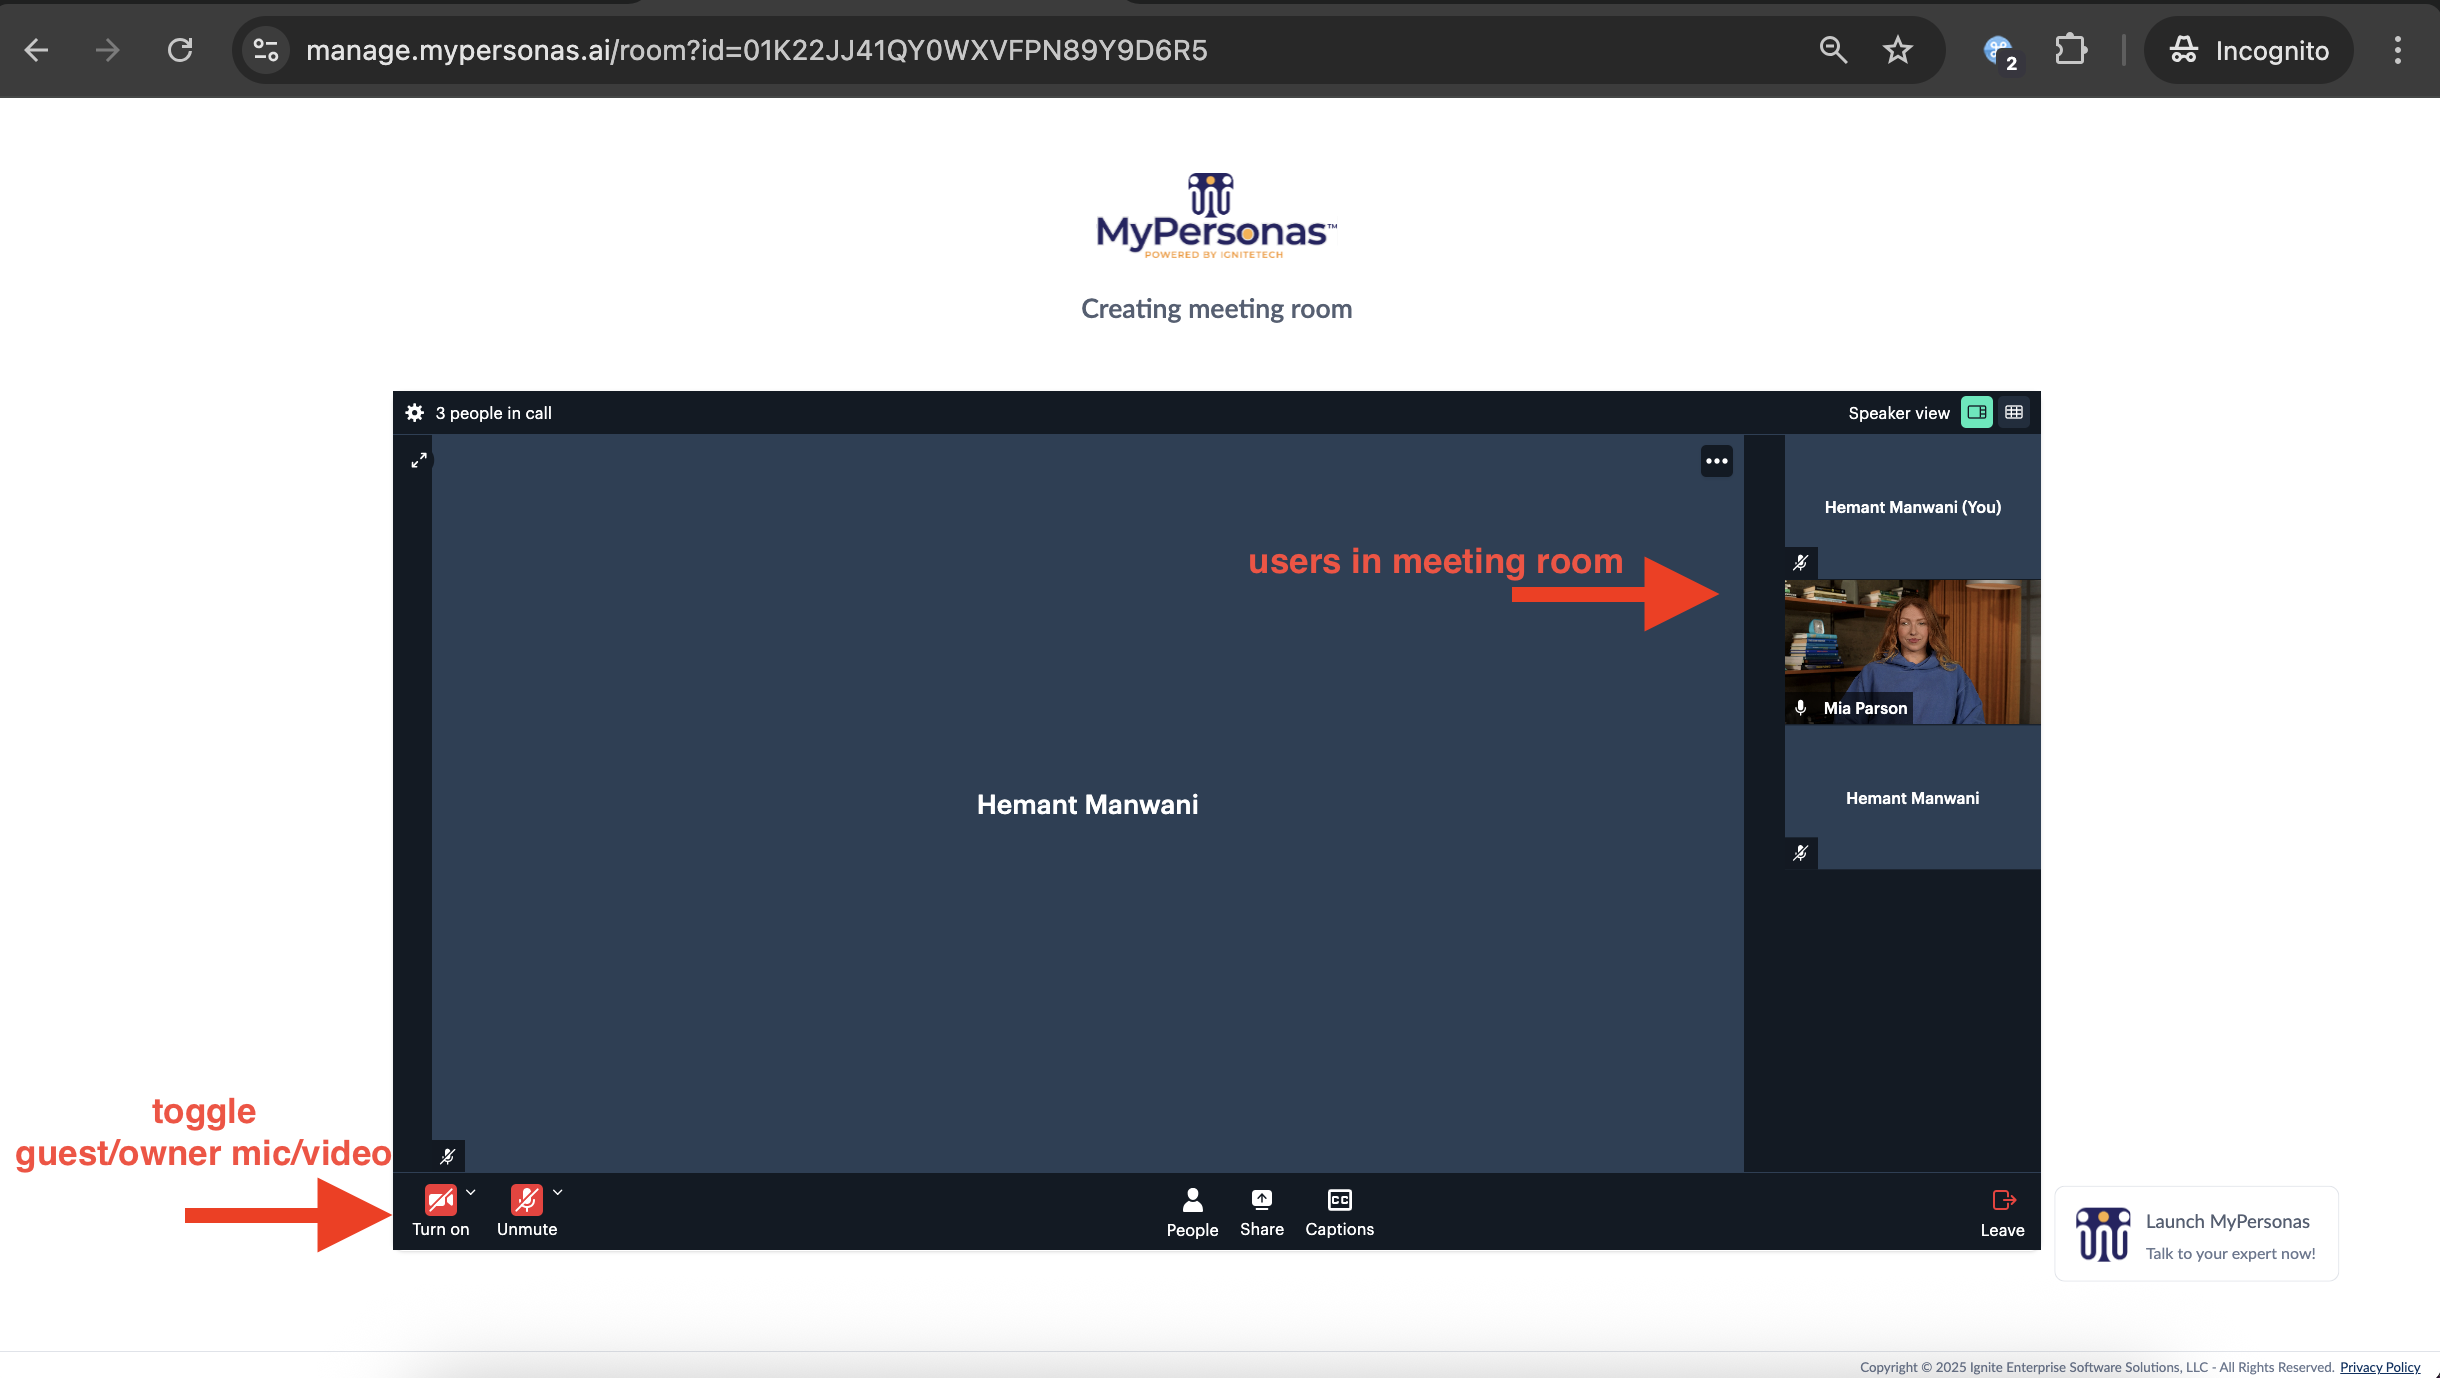
Step 4: Meeting Room Experience
Once allowed:
-
The guest will enter a waiting room where they can choose to:
-
Enable/disable camera
-
Mute/unmute mic
-
Join the session
-
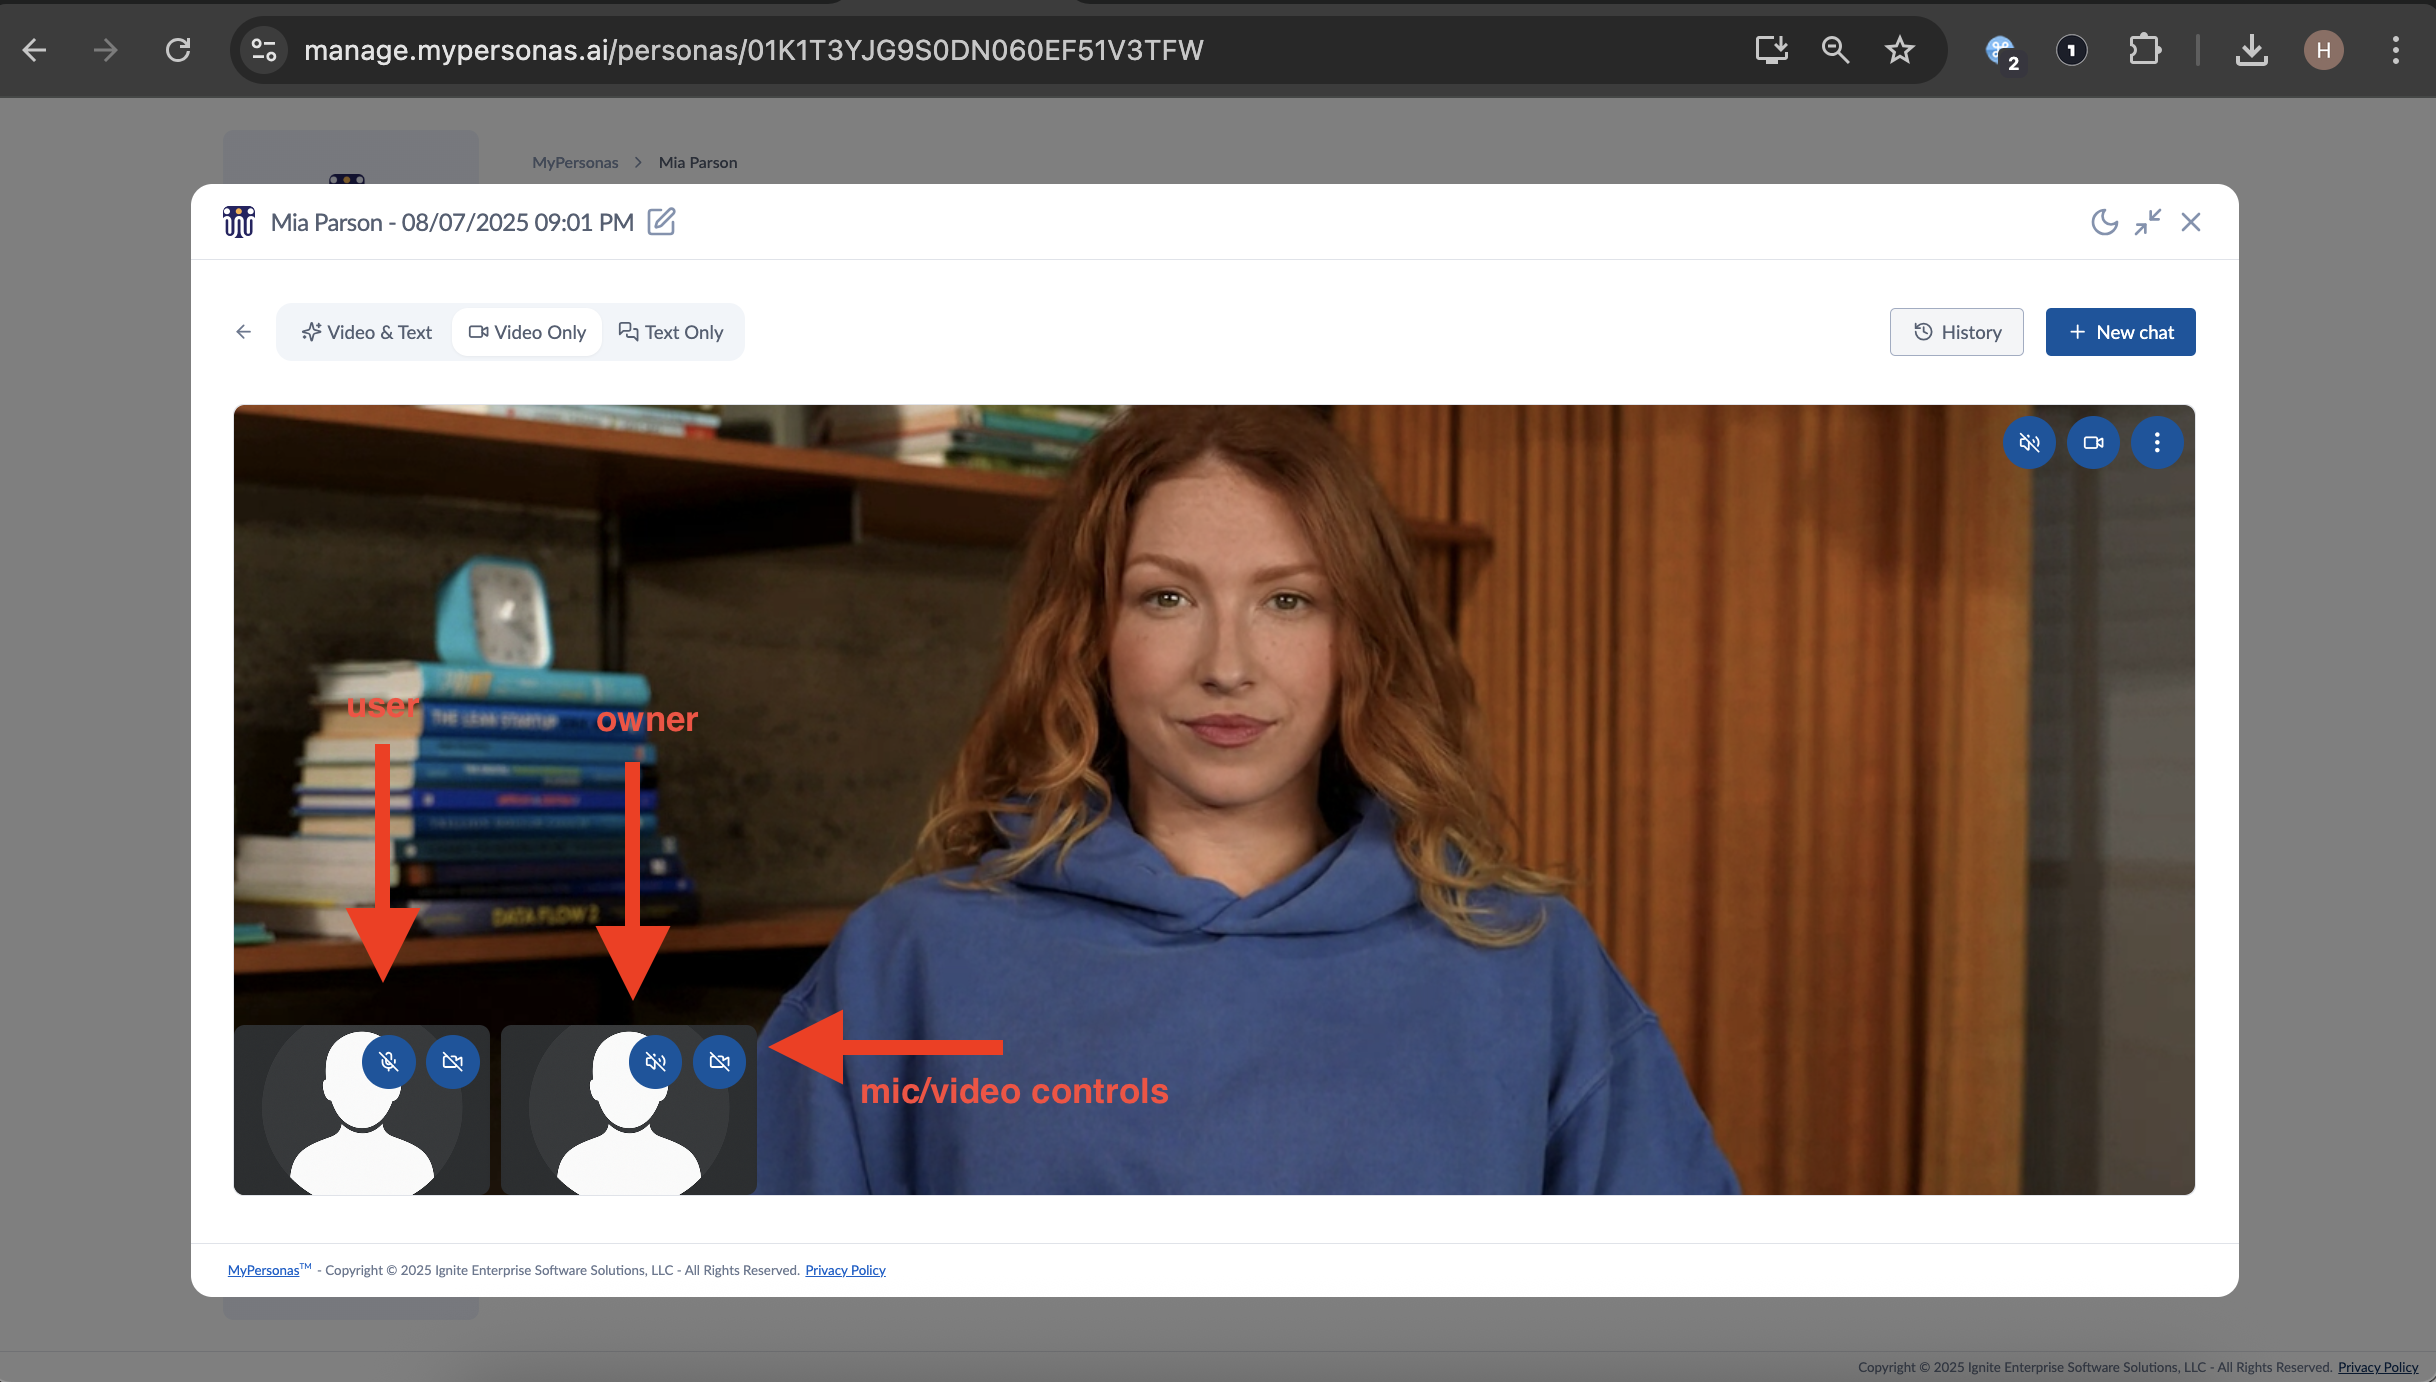
After joining:
-
The mode changes to video only, and the guest appears in the video thumbnail section.
-
Now, three participants (user, MyPersona, and guest) are present in the call.
Video and Audio Controls for All Participants
Each participant—user or guest—can:
-
Turn their video on/off
-
Mute/unmute themselves
-
Control video/audio of other participants (if permissions allow)
These controls are accessible via the video thumbnails within the call interface.
Use Cases for Guest Invites
-
Internal Expert Consultations: Bring a teammate into a live customer interaction for immediate support.
-
Client or Partner Demos: Invite external guests without giving them full admin access.
-
Real-Time Escalation: Use this as part of a human-in-the-loop strategy when digital MyPersonas escalate a question they can’t answer.
Best Practices
-
✅ Use conversation URLs for internal collaboration
-
✅ Use email-based guest invites for external participants
-
🔒 Only allow trusted users into your sessions
-
🛠️ Test the process internally before using in live customer sessions
Managing Multi-User Call Settings from the Admin Dashboard
In addition to inviting users and guests during a live session, admins can configure key settings from the MyPersonas Admin Dashboard that control whether multi-user collaboration is allowed at all.
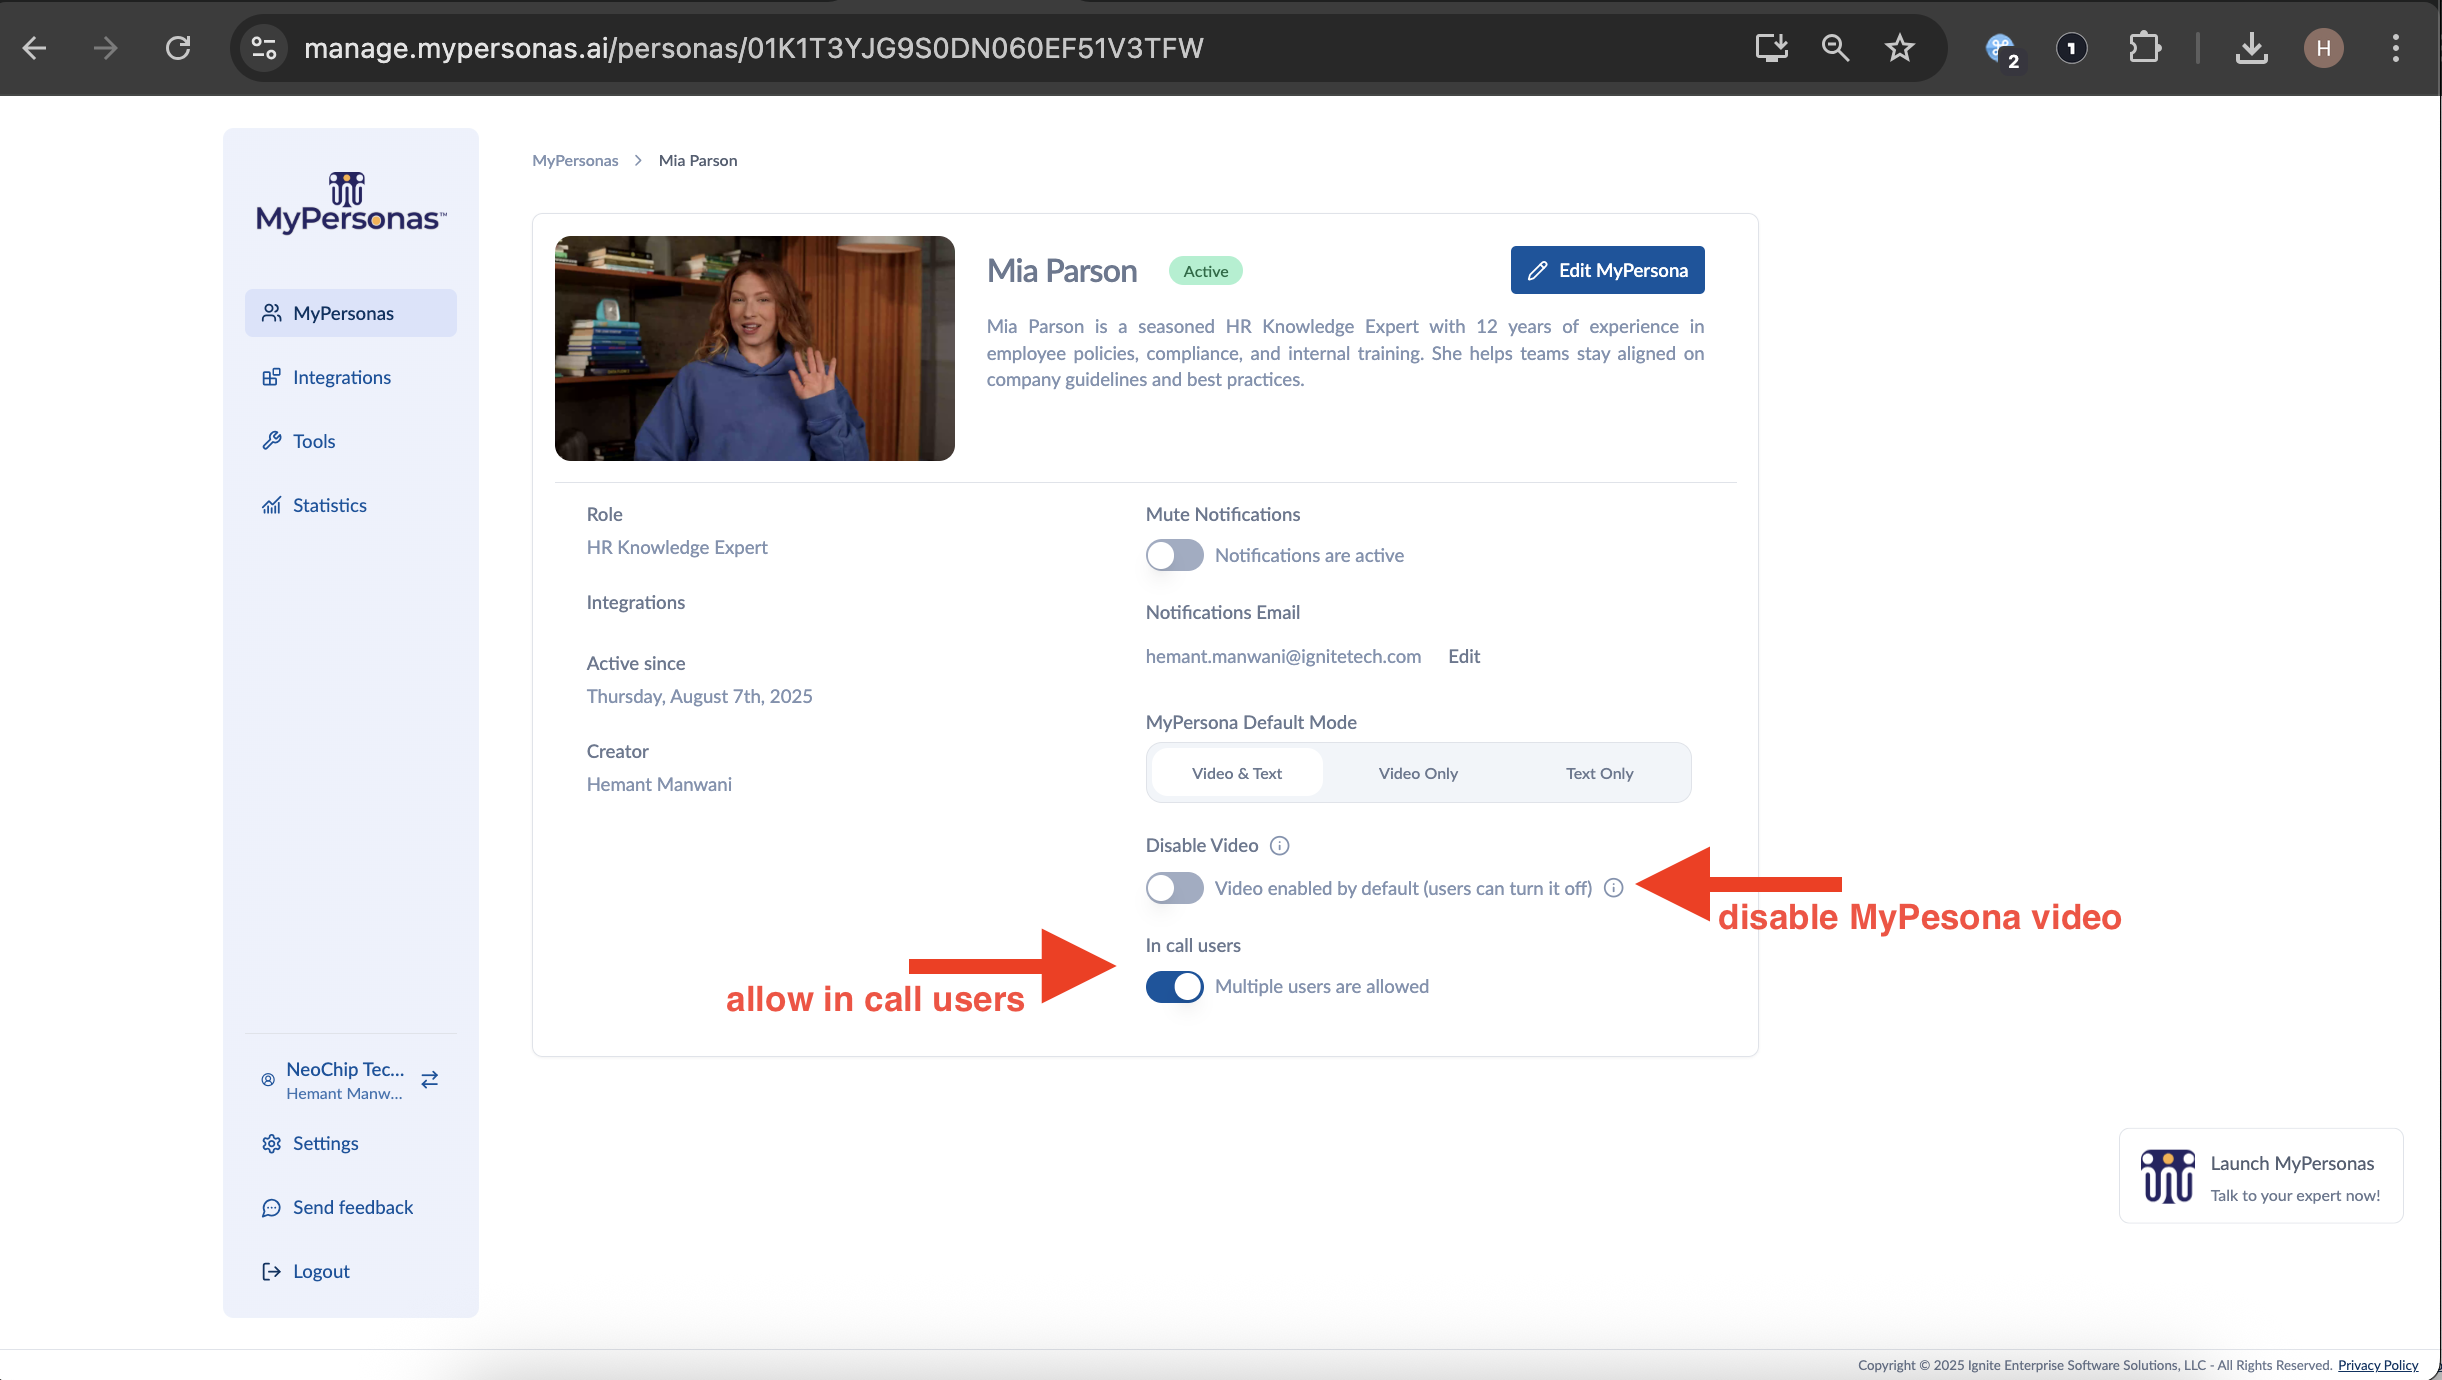
Step 1: Access the MyPersona Configuration
-
Go to your MyPersonas Dashboard.
-
Click on the specific MyPersona card to open its Details View.
-
Here you will find important toggles that affect call behavior:
✅ In-Call Users (Toggle)
-
Purpose: Enables or disables the ability to invite additional users to join a live session.
-
Default: Enabled
-
When OFF:
-
The “Copy Conversation URL” option will be hidden.
-
The “Invite Guest via Email” feature will also be disabled.
-
MyPersona sessions will be restricted to a single user only.
-
🛑 If you try to initiate a conversation and invite others while this switch is off, you will not see any options for inviting participants.
🎥 Disable Video (Toggle)
-
Purpose: Allows you to restrict the MyPersona to text-only interactions.
-
When Enabled:
-
The Video and Video + Text interaction modes are no longer available.
-
Users will only be able to use Chat-Only Mode to communicate with the MyPersona.
-
The interface will display a clear message: “Video is disabled by the owner.”
-
Example Scenario
Let’s walk through a configuration and its result:
-
Disable "In-Call Users":
-
You’ll find that both URL sharing and email invitations are unavailable during sessions.
-
-
Disable Video:
-
The conversation will be restricted to text-only.
-
The user interface clearly reflects this, both functionally and visually.
-
Best Practices for Setup
| Setting | When to Use It | Result |
|---|---|---|
| In-Call Users: ON | You want collaborative sessions with guests or team members | Enables conversation URL and guest invite options |
| In-Call Users: OFF | You want private 1-on-1 sessions | Removes all invite functionality |
| Disable Video: ON | Optimize for low bandwidth or text-only support | Restricts to Chat-Only Mode |
| Disable Video: OFF | You want full video interaction | Enables Video and Video + Text Modes |
Configuring these toggles gives you fine control over how each MyPersona behaves during interactions. For multi-user calls, make sure both In-Call Users and Video are enabled to provide the full collaborative experience.
Hemant Manwani
Comments